Importing External Files As Joint Manager
Joint provides a convenient way to import external files into the Joint Manager and track/update them.
The external files referred to here are text-based format files such as CSV and JSON. As long as you implement a matching Parser for any file type, you can import them into the Joint Manager and implement them as nodes in the graph. Once imported, files are tracked in the Joint Script Management tab, where they can be re-imported at any time to stay up to date.
In this document, let’s take a closer look at these powerful features provided by Joint.
Since this feature is still in its early version, it may not be perfect in terms of usability or stability. While we previously announced that Joint's development direction from the 2.13 Milestone version onward would shift toward maintenance, we consider this specific feature to be highly critical. We truly hope this feature proves useful to many users, and as such, we plan to diligently update the convenience features, especially those related to Joint Script elements.
If you encounter any inconveniences or have suggestions for improvement while using it, please feel free to send us your feedback! We will do our best to improve it.
We would like to express our gratitude once again to everyone who provided advice on this feature. In particular, a special thanks to HoppingHermit from Reddit, who shared many ideas regarding the necessity of external file importing and its design! (While we unfortunately couldn't directly implement the Markdown file import as you suggested, we have instead implemented a system capable of importing various text-based formats including Markdown, so we hope you find satisfaction in that.)
Joint Script Management
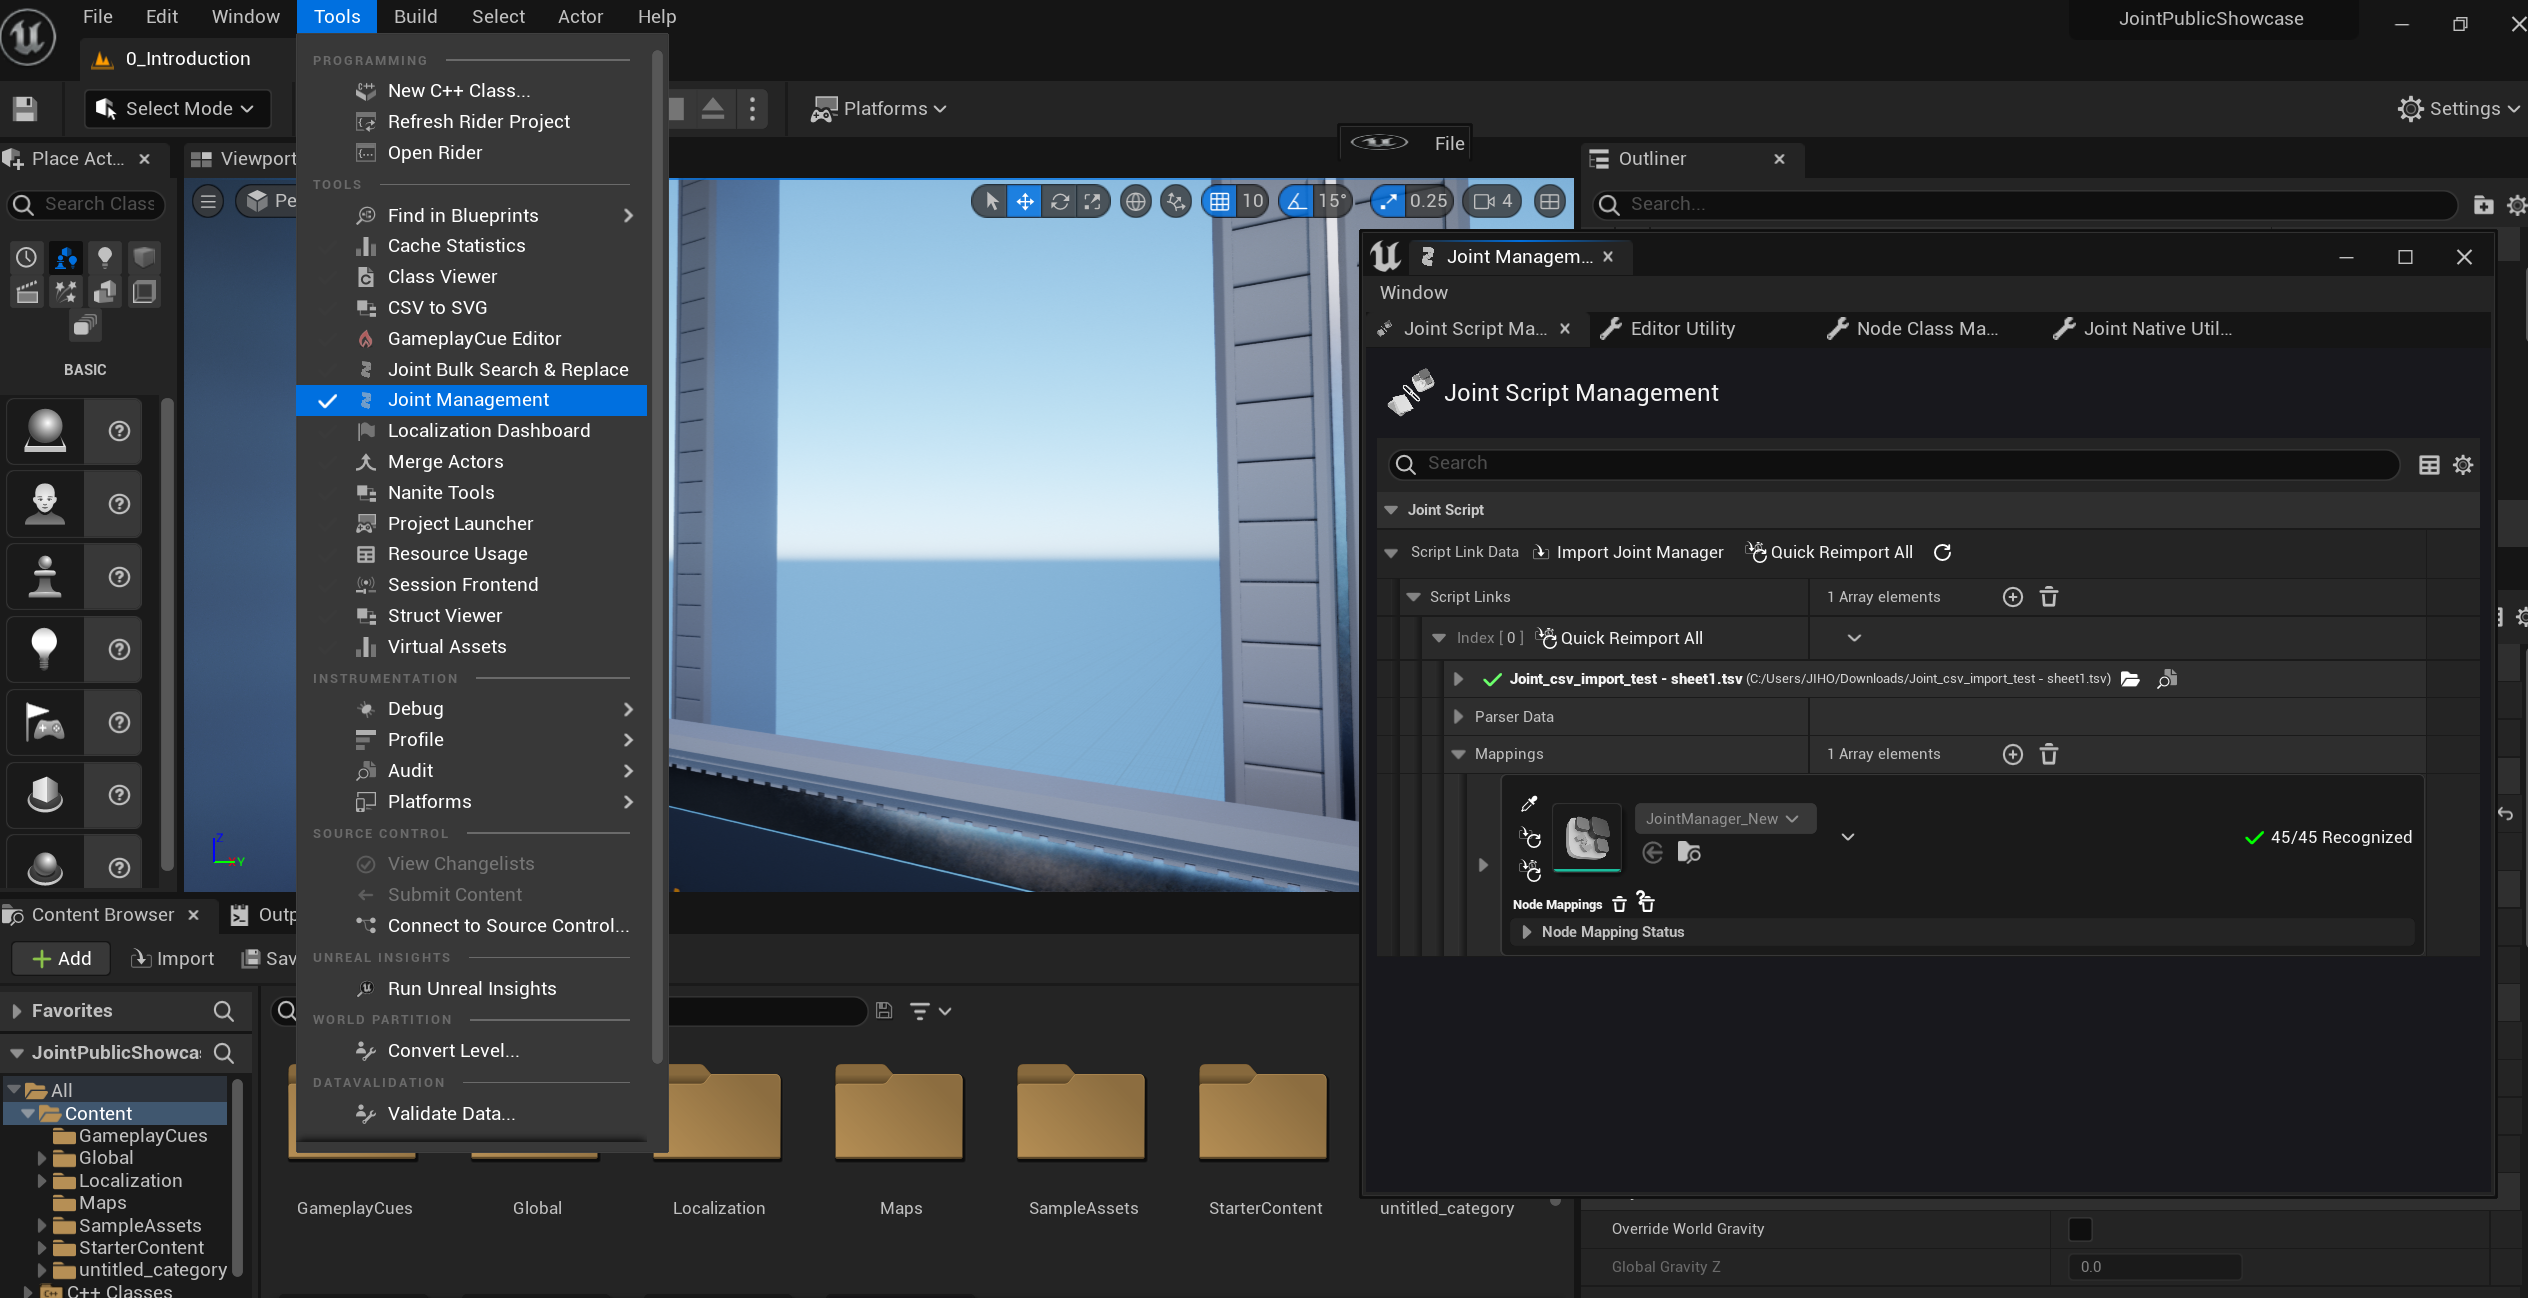
Joint Script Management is a new functional tab where you can manage and work with most data related to the external file linking feature. You can open it via Tools -> Joint Management -> Joint Script Management in the Level Editor.
Importing Joint Manager
Trying a New Joint Manager Import
Now, let's try importing a file directly. In this example, we will download a sample external script file in .tsv format and import it into the project as a Joint Manager. First, please download the example .tsv file from the path below:
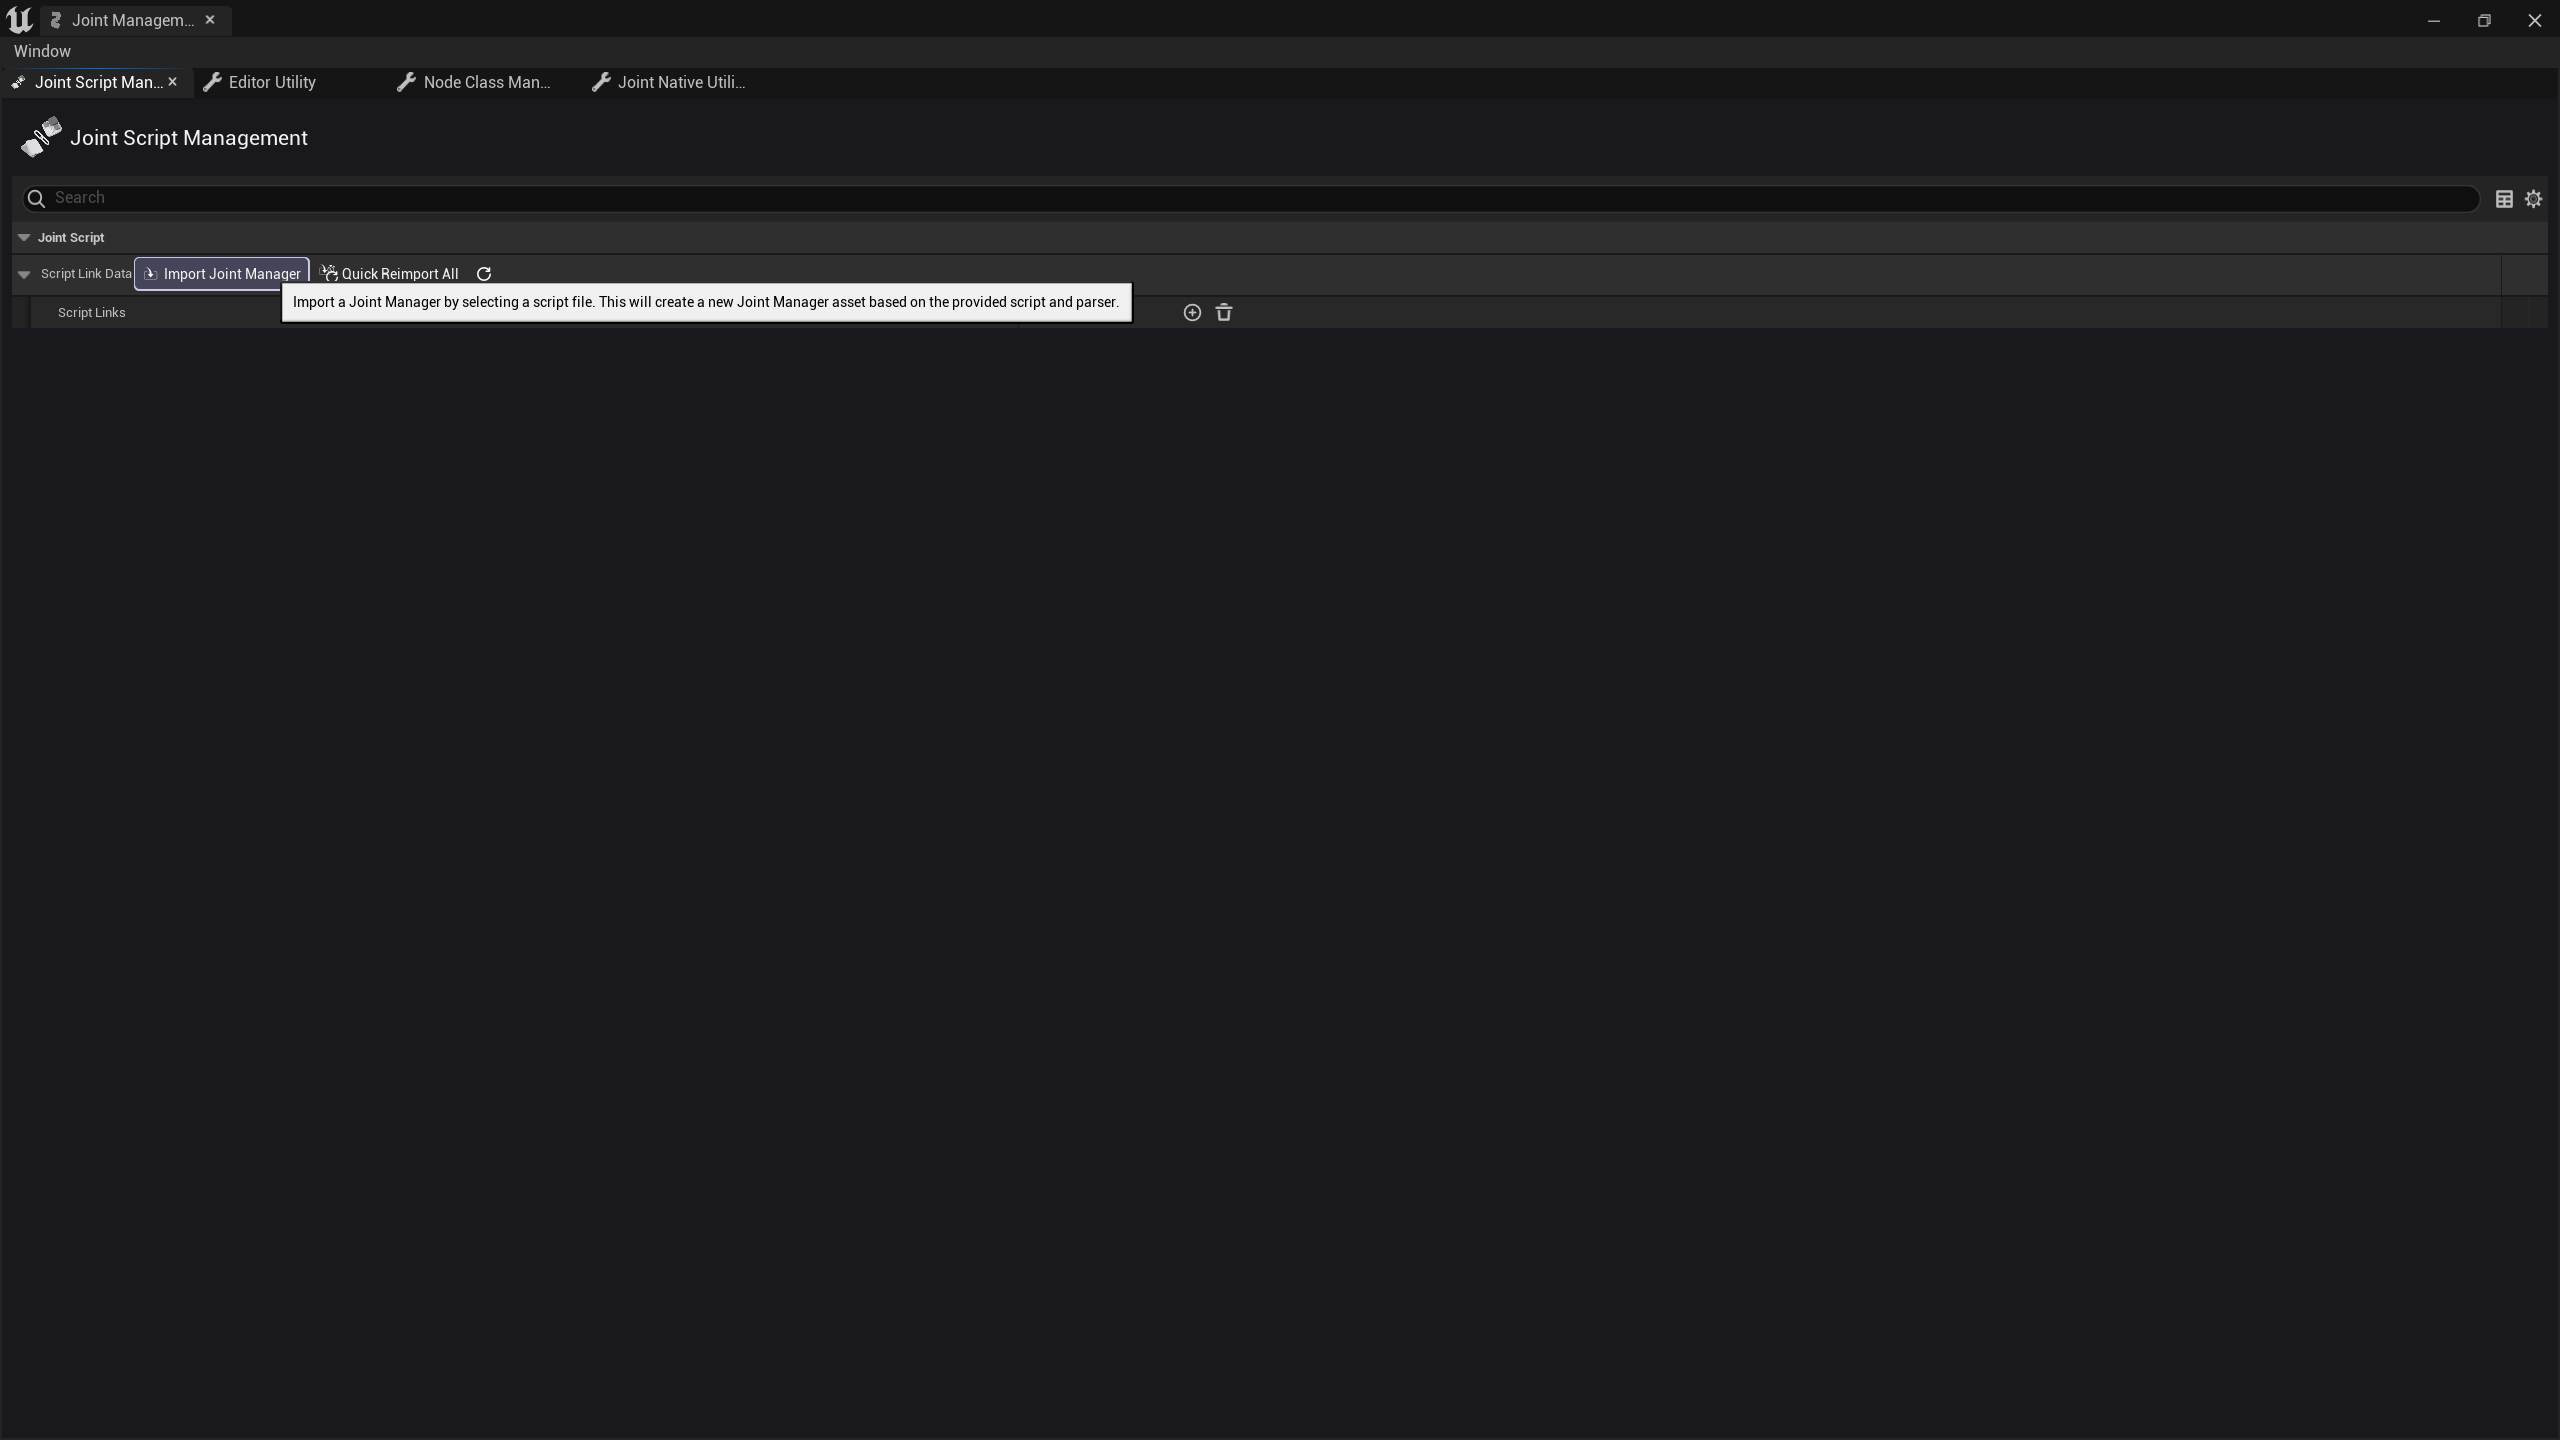
Once you have the file, go to the Joint Script Management tab and click the "Import Script File" button. You will see the following asset import dialog appear:
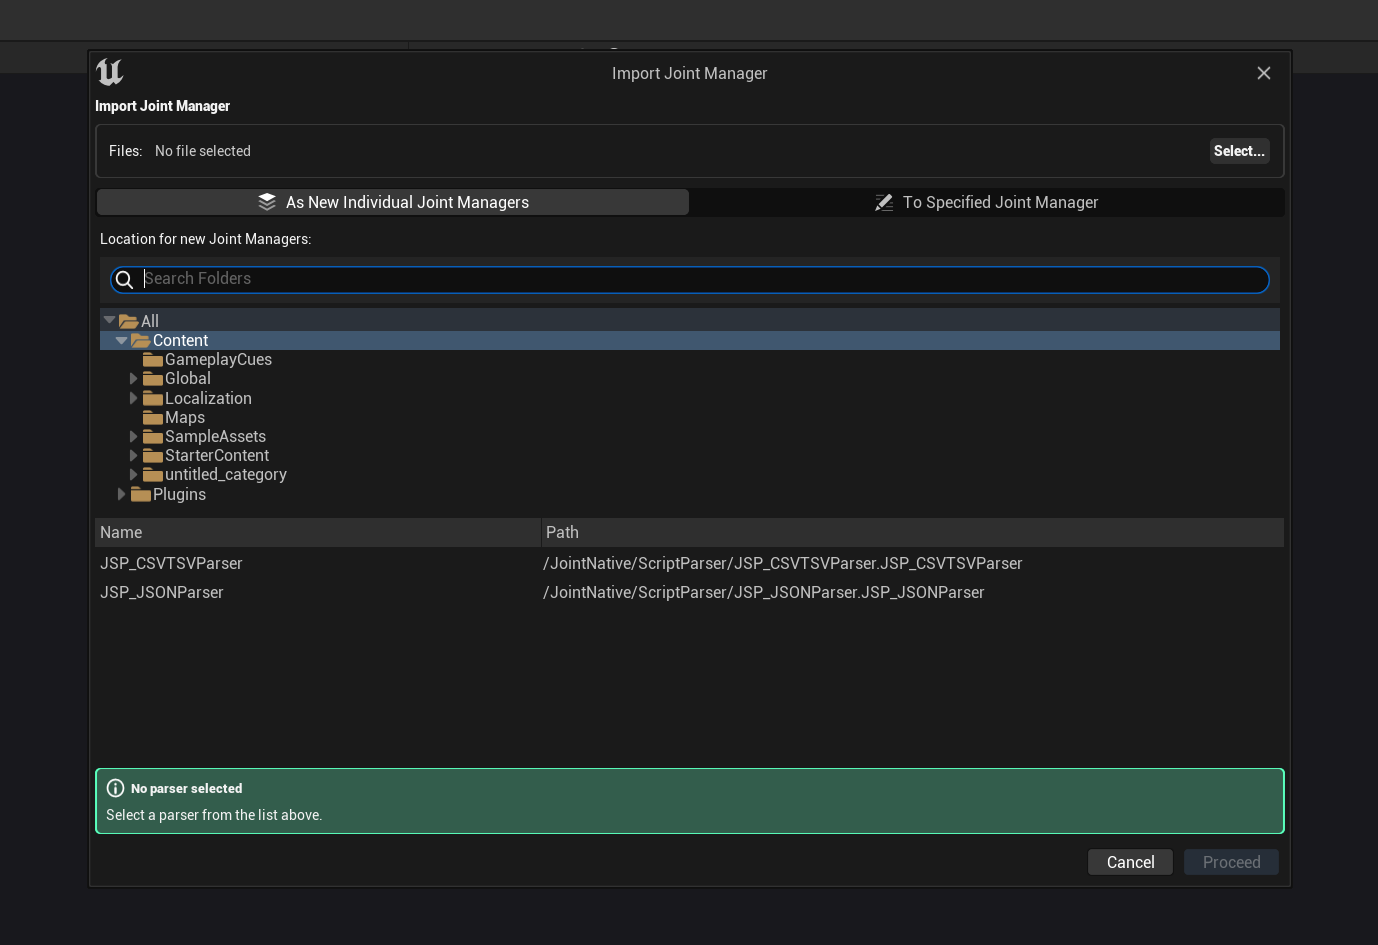
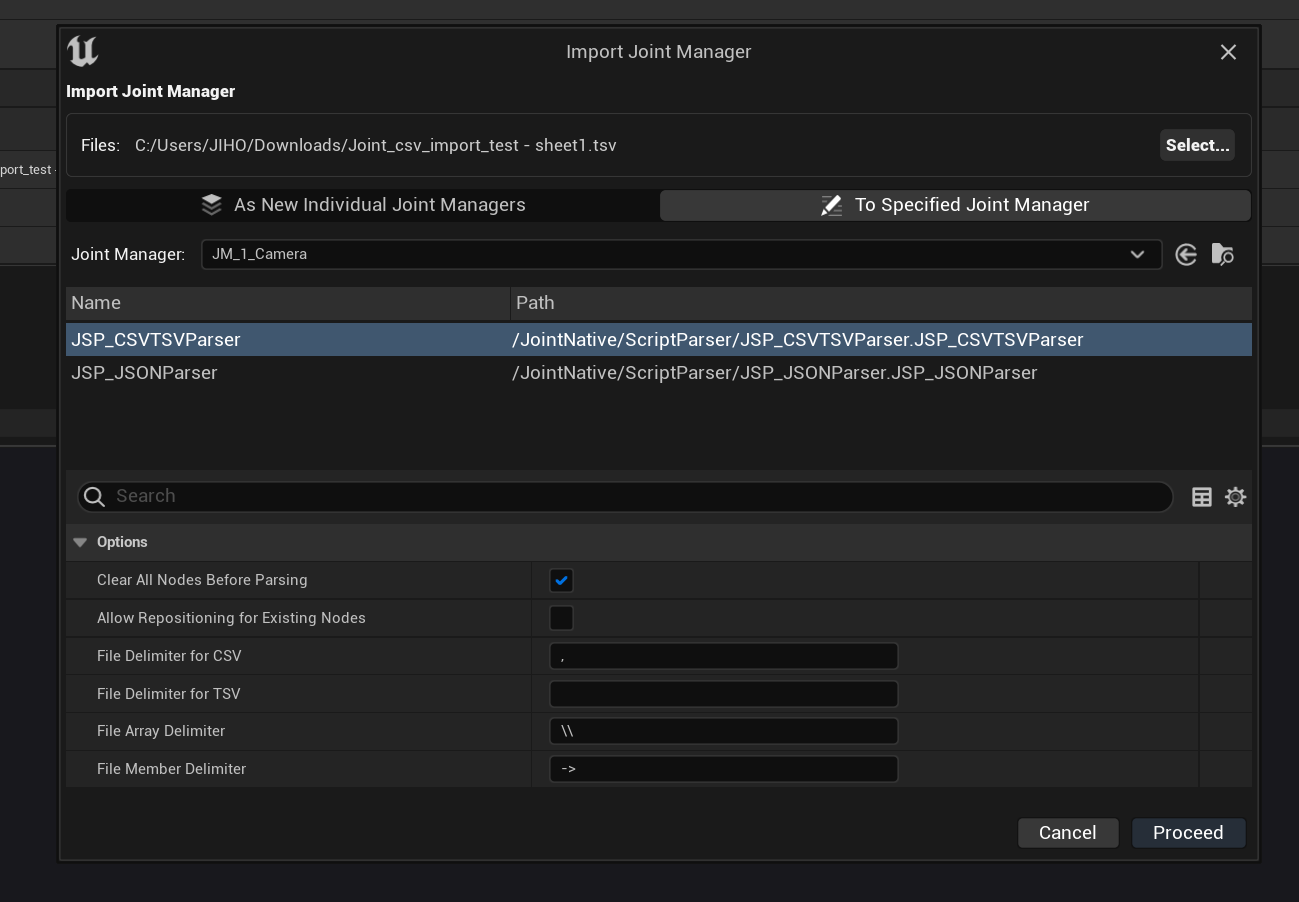
Click the Select... button to choose the downloaded .tsv file, select JSP_CSVTSVParser as the parser, set your desired import location, and then click the Proceed button. Keep the Import Mode as 'As New Individual Joint Managers'. The Proceed button will then become active, allowing you to proceed with the import.
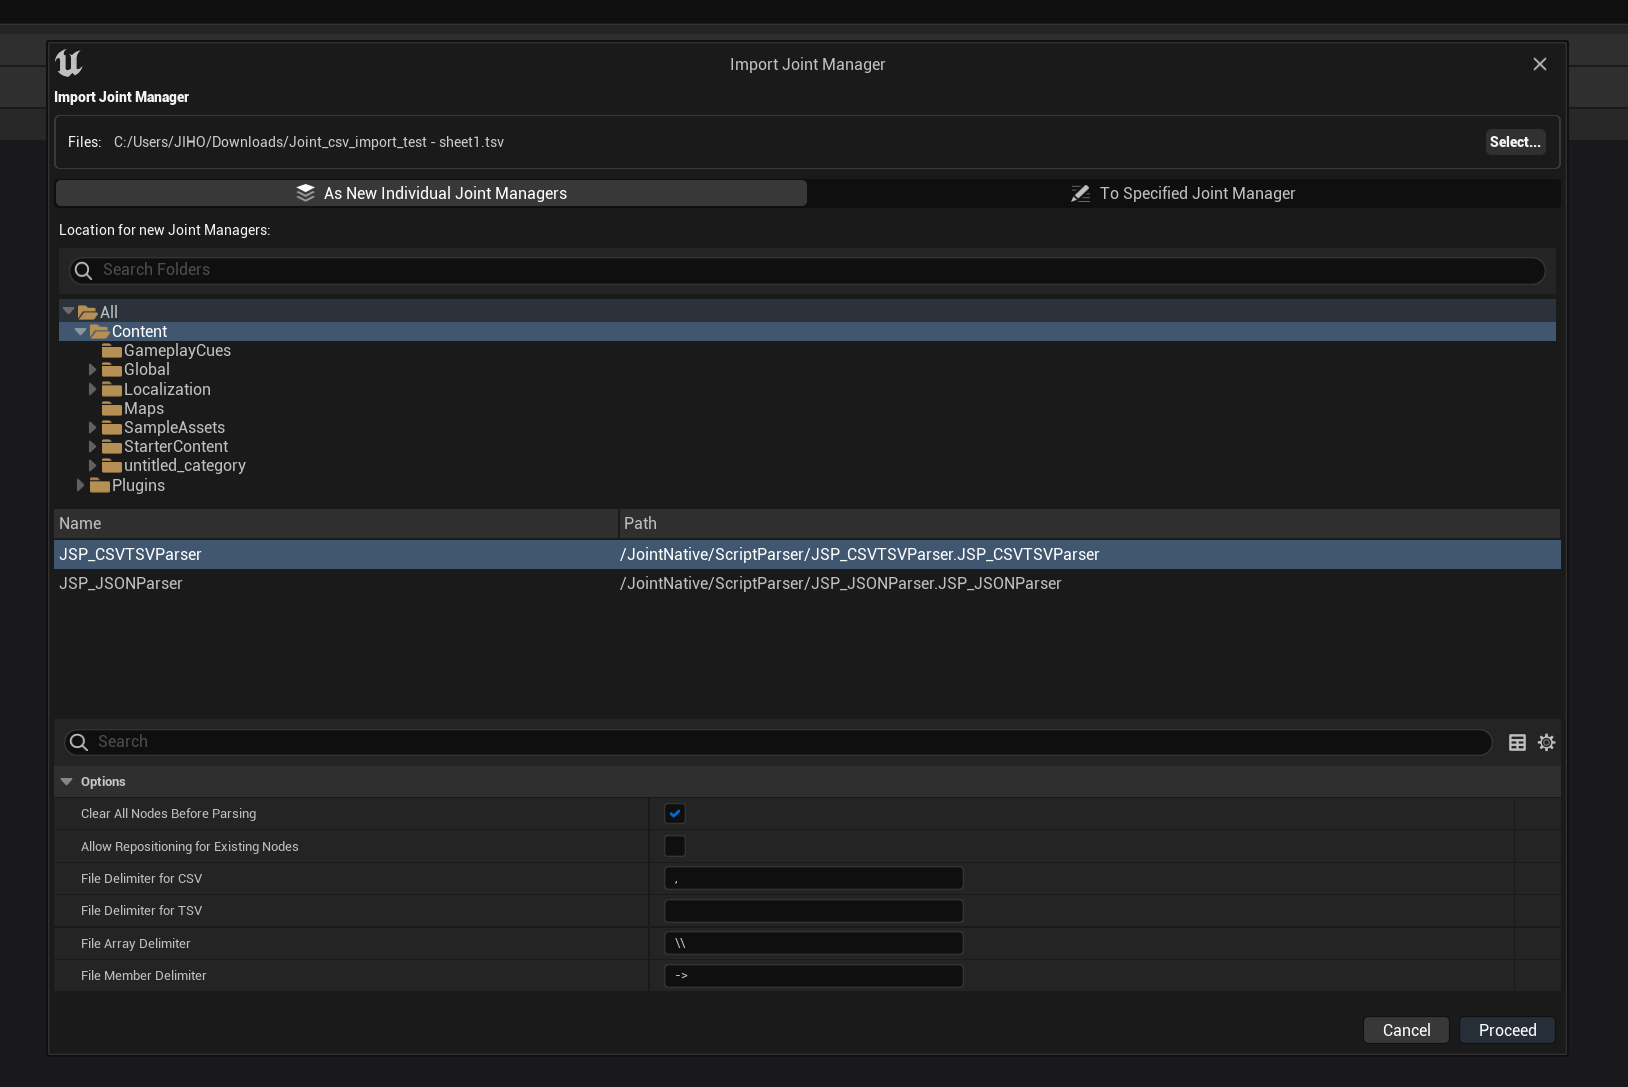
The configuration screen before clicking Proceed looks like this:
When you select a parser, configuration options specific to that parser will appear on the screen. For example, JSP_CSVTSVParser (the parser for CSV/TSV files) provides options to set array, column, and member delimiters, or a toggle to decide whether to remove existing nodes during re-import.
The settings configured here are applied when you proceed with the import, and the data is recorded in the entry so that you can re-import with the same settings later.
For now, let's proceed with the default options.
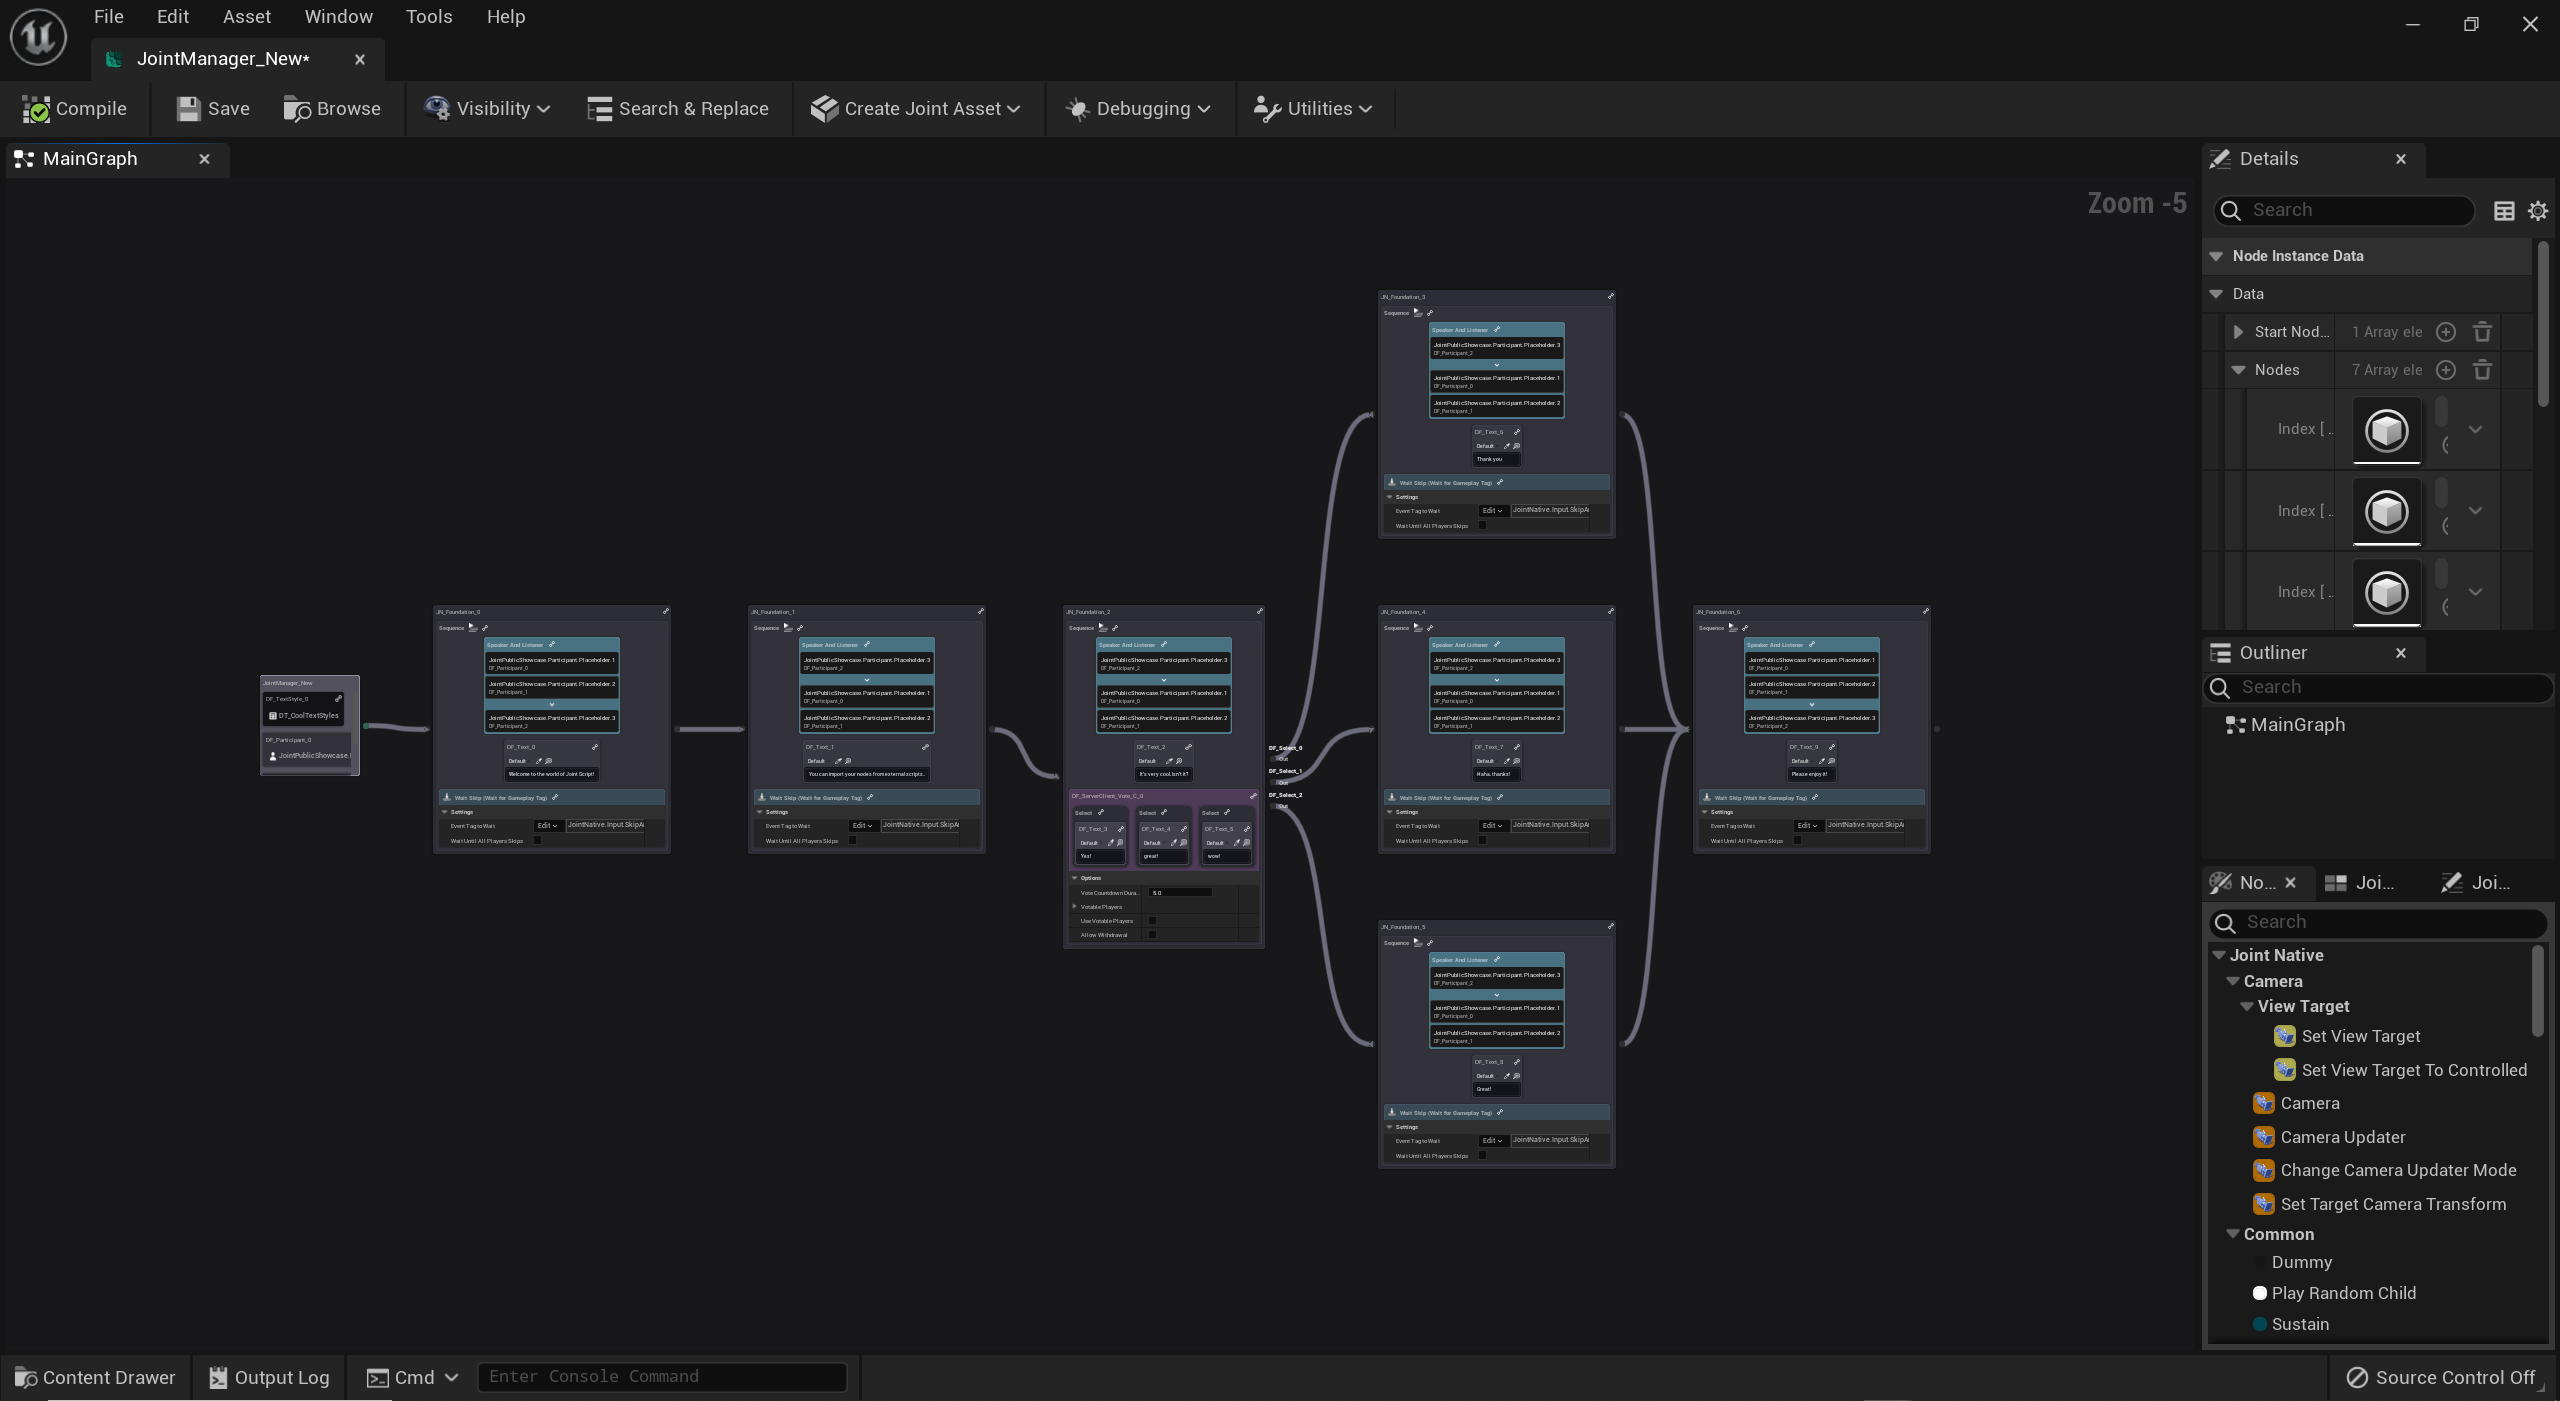
Upon clicking Proceed, the file is imported, an editor opens for the newly created Joint Manager asset, and you can see the imported nodes implemented in the graph.
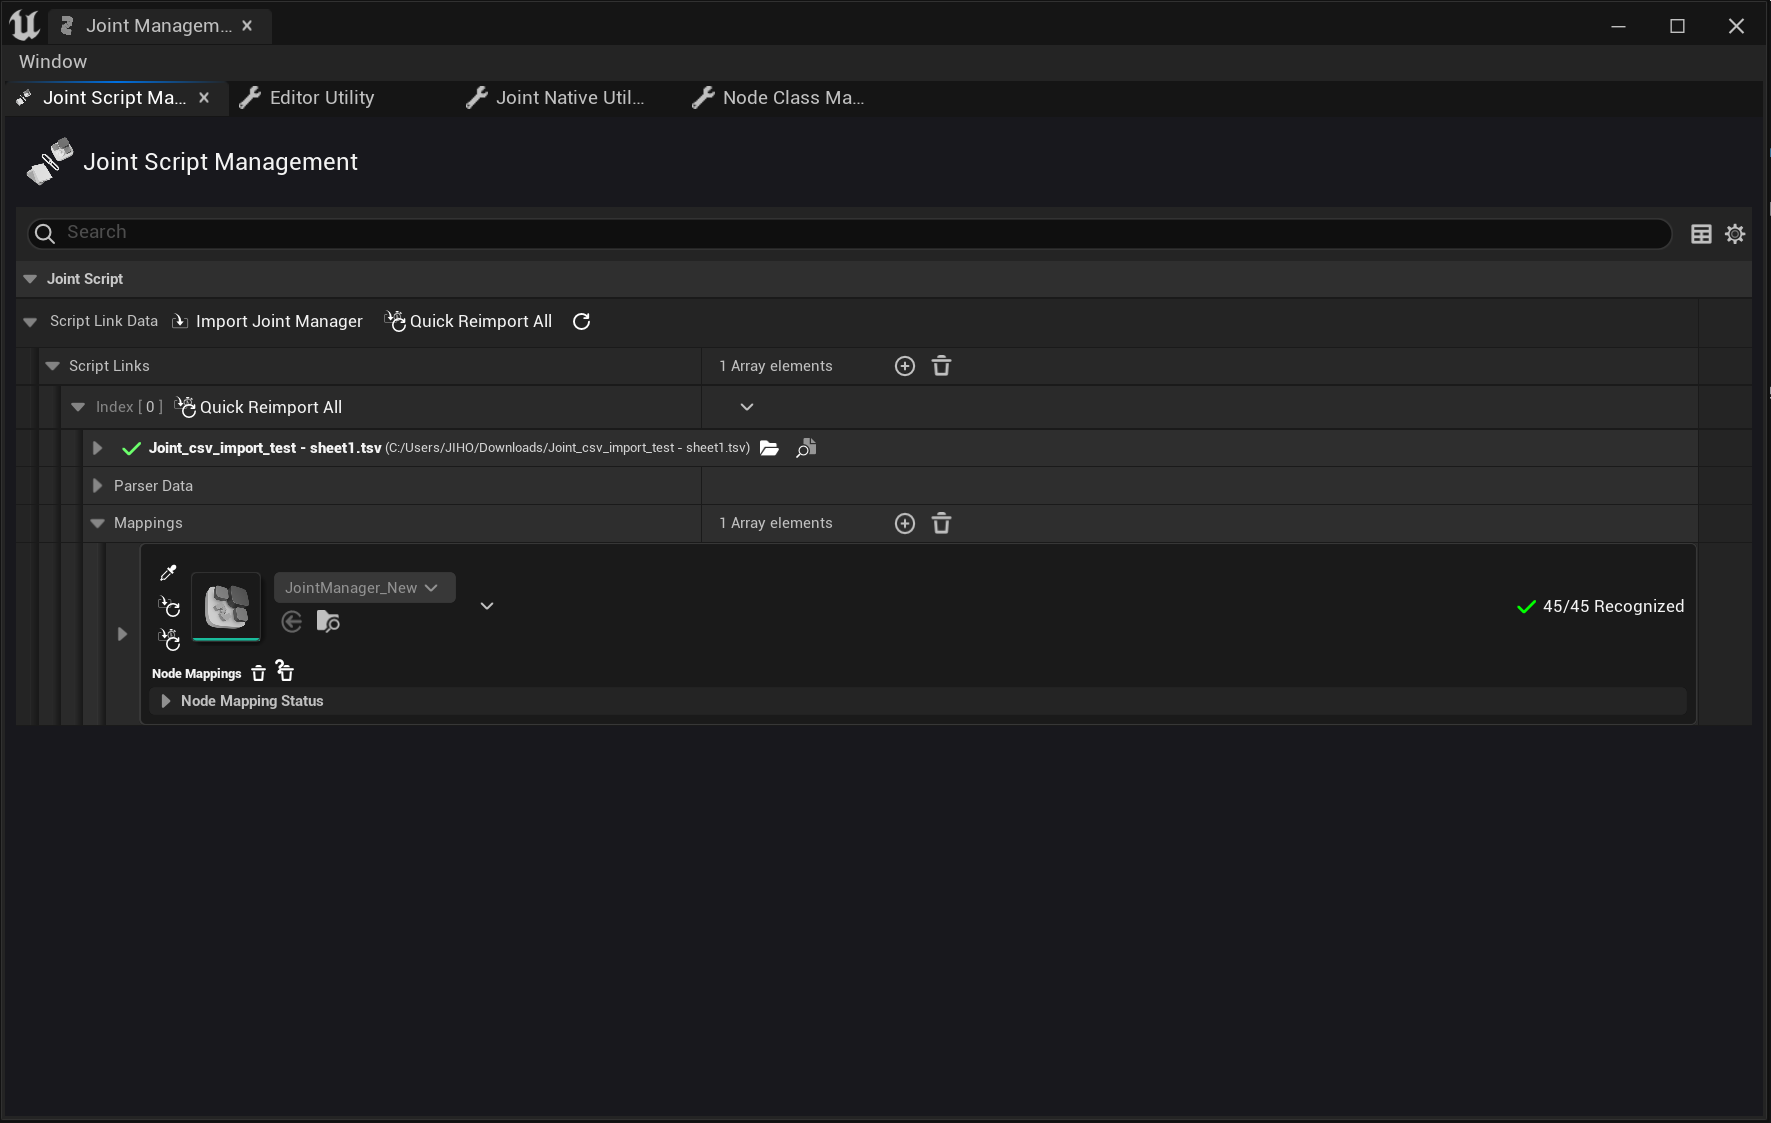
Checking the Joint Script Management tab, you can see that the file we imported has been added as an entry, recording information about the parser used, the imported Joint Manager, and the imported nodes.
That's it. Now you can use the generated Joint Manager in your project.
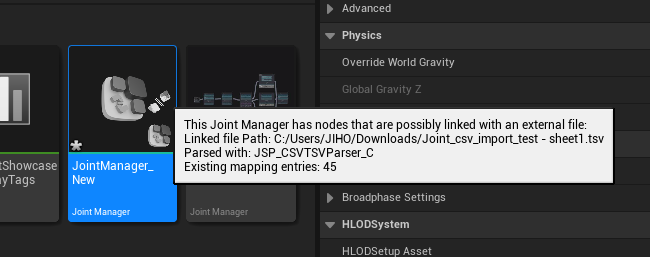
Joint Manager asset thumbnails that are linked to an external file will display a Linked icon. Hovering over this icon will show a tooltip with information such as which file it was imported from and which parser was used.
Importing Files into an Existing Joint Manager
There may be cases where you want to import nodes from an external file into an existing Joint Manager rather than creating a new one.
In this case, click Import Script File as before, change the Import Mode to 'To Specified Joint Manager', and select the Joint Manager you wish to import into. The Proceed button will then be enabled, allowing you to import the file.
Trying a Joint Manager Re-import
Files that have been imported once can be re-imported by finding the entry in the Joint Script Management tab and clicking the 'Reimport' button for that entry.
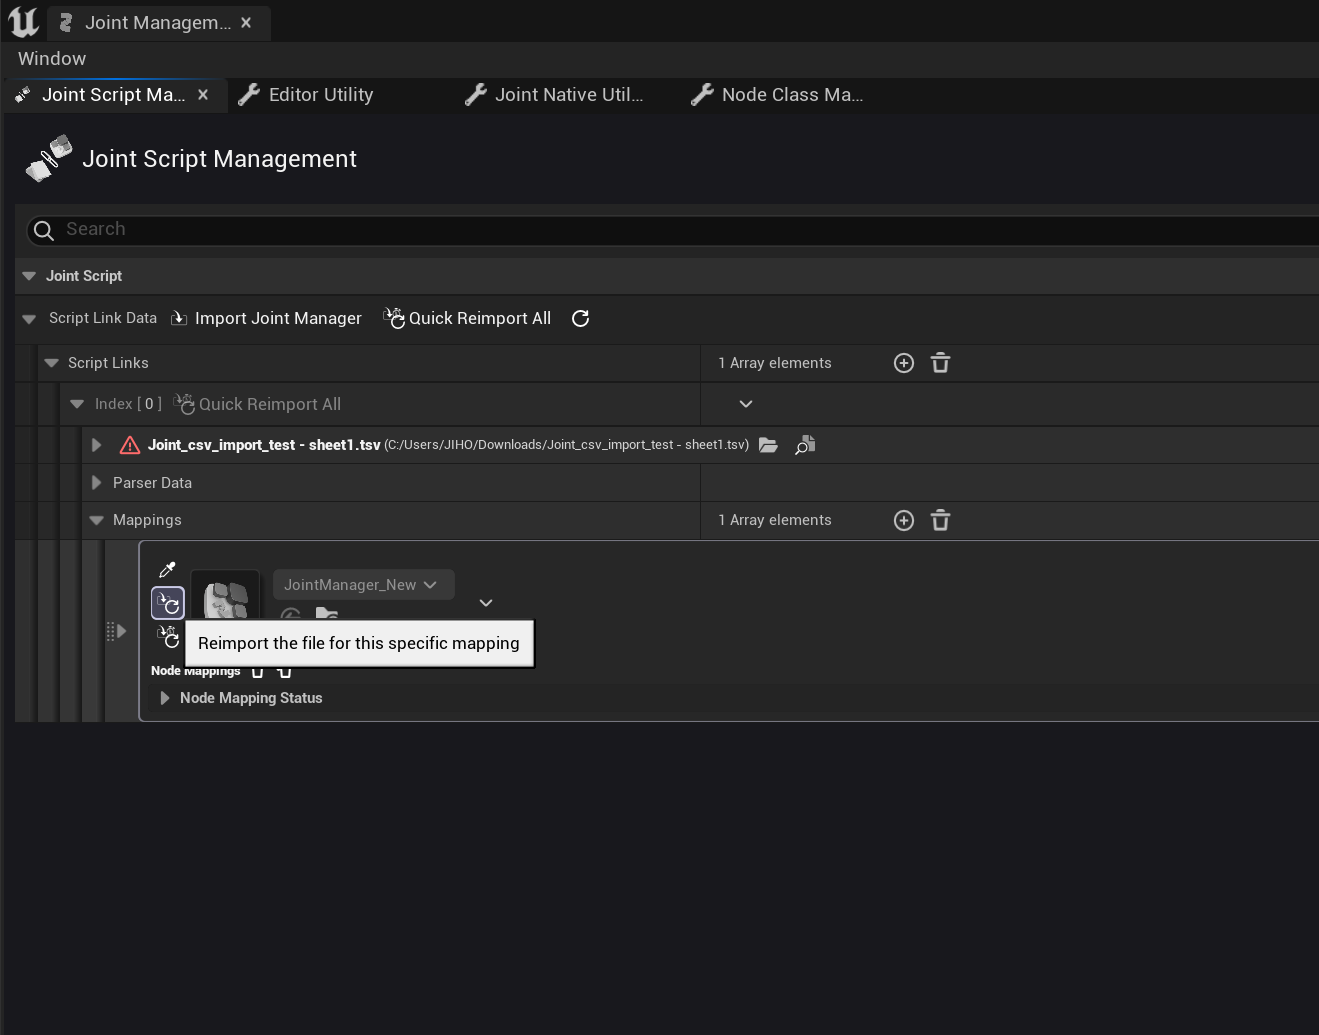
Quick Re-import
Quick Re-import allows you to re-import the same file while maintaining the parser and settings used during the last import (or re-import).
If an external file has changed and you want to reflect those changes in the Joint Manager, this is the fastest method.

The buttons marked with a blue box in the image above are all for Quick Re-import, but they differ in their scope of application.
- The top button re-imports "all linked Joint Managers saved in the project."
- The middle button re-imports "all Joint Managers recorded in that specific file entry."
- The bottom button re-imports a "specific Joint Manager recorded in that file entry."
Re-import (Advanced Configuration)
Sometimes, you may want to change the parser settings during a re-import. In this case, instead of the Quick Re-import button, click the 'Reimport' button to open the Reimport Dialog.
This opens the Reimport Dialog. Here you can change the parser settings or simply click the Proceed button to re-import with existing settings.
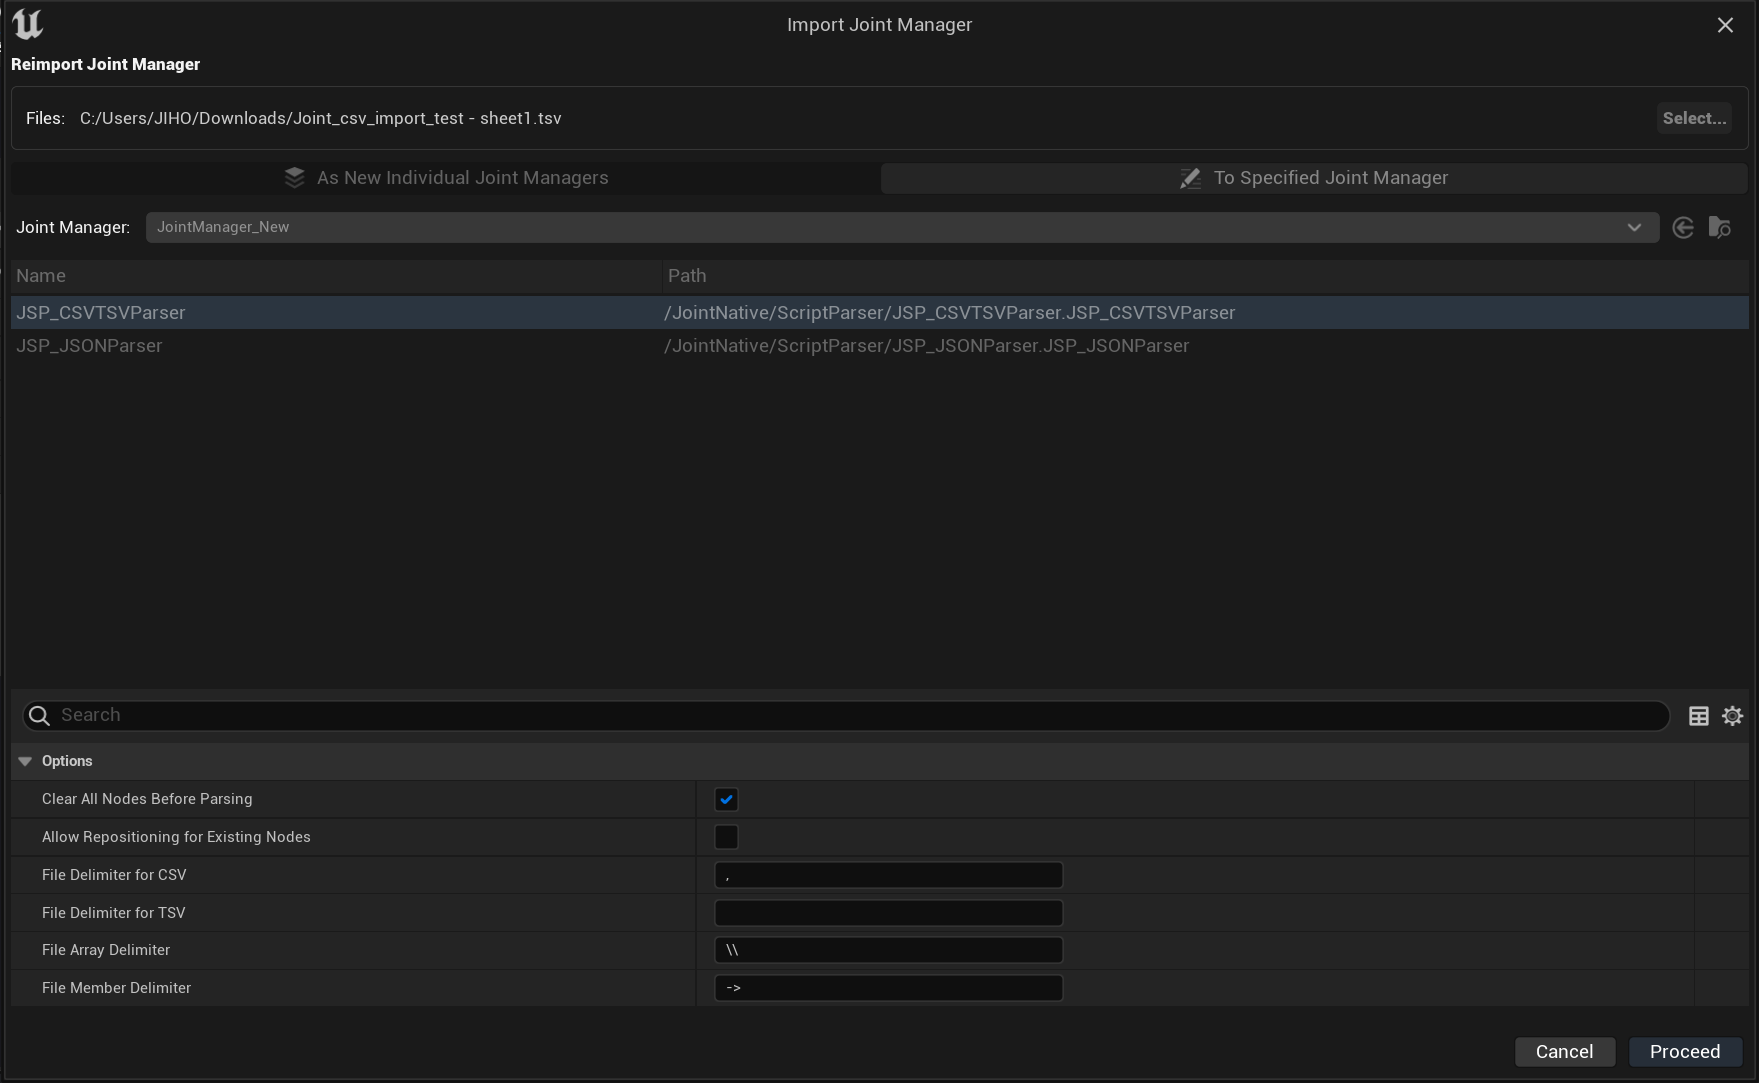
If you change the parser settings here, the updated settings are recorded in the entry, and they will be loaded for future Quick Re-imports or detailed re-imports.
Reassigning File Entries
If an external file has been moved or replaced by another file and you want to reflect this in the Joint Manager, find the entry in the Joint Script Management tab and click the 'Reassign' button to reassign the entry to the new file.
If the system cannot find the file for a specific entry, the check icon will change to a red warning icon. This makes it easy to identify entries that require reassignment.
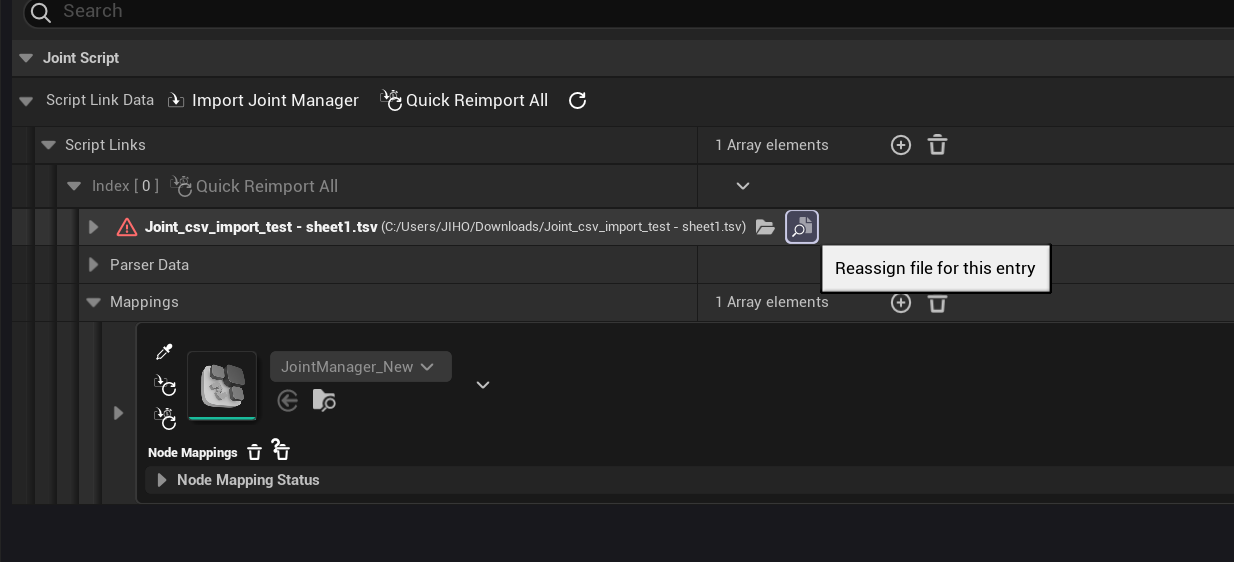
After reassignment, you should proceed with a re-import if necessary (reassigning alone does not apply changes to the Joint Manager; it merely updates the file path recorded in the entry).
Reassigning Joint Managers
If a Joint Manager has been deleted or the link has been broken for some reason, you can click the eye-dropper shaped Assign button to reassign a new Joint Manager to that entry.
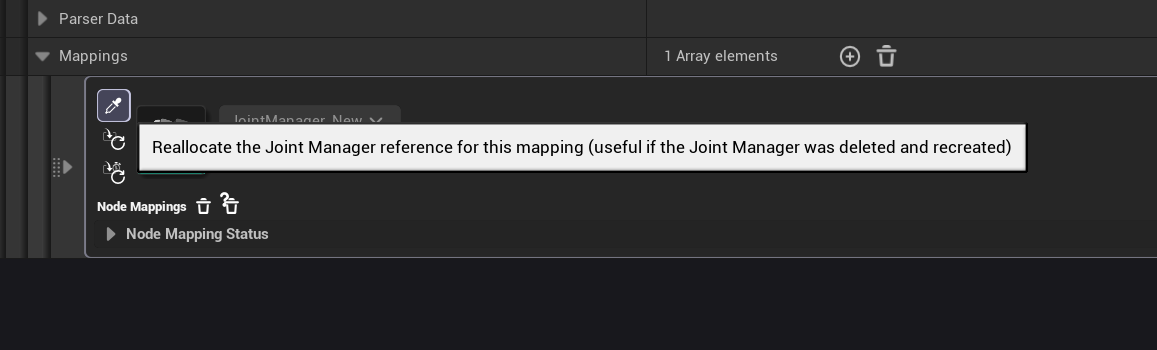
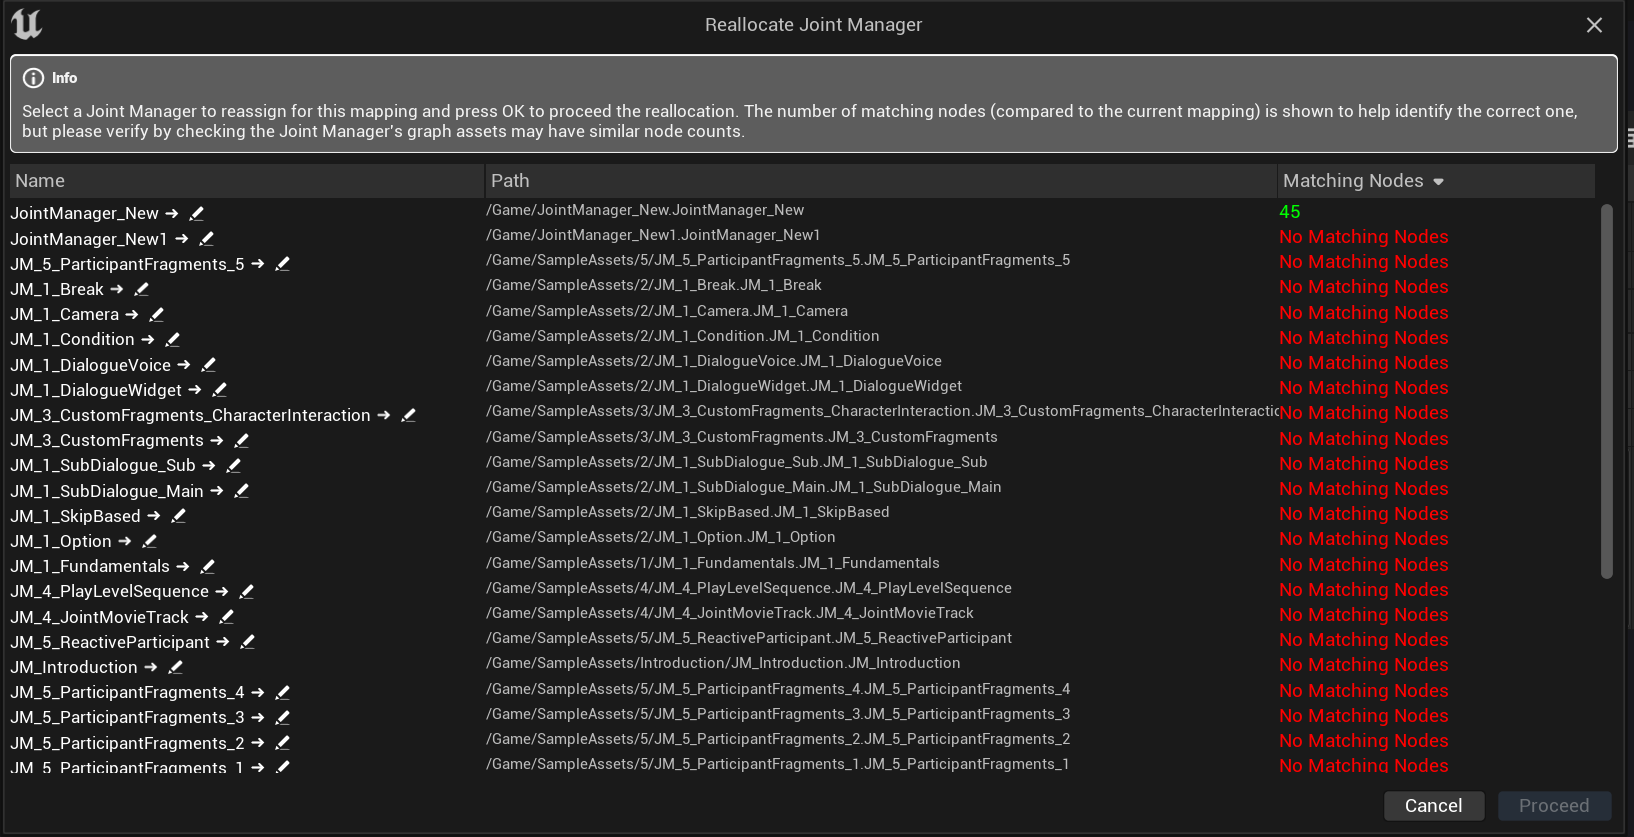
Clicking the Assign button opens a dialog where you can select a Joint Manager. Choose the desired Joint Manager to reassign it to the entry.
This dialog shows how many GUIDs of the imported nodes stored in the entry match the nodes currently existing in each Joint Manager, sorting the list in descending order. This helps you identify which Joint Manager was previously linked before the connection was lost.
Unless it's a critical case, simply importing the file as a brand new Joint Manager might be faster. Of course, it depends on the situation!
Exploring Joint Script Parser
As mentioned earlier, Joint's external file importing system works by "interpreting text-based data into Joint data and implementing them as nodes in a graph." The Joint Script Parser is the object type responsible for implementing external text data as a graph.
By default, Joint provides JSP_CSVTSVParser, which helps implement CSV and TSV files as graphs.
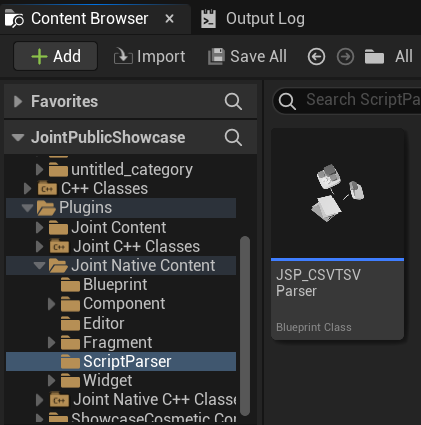
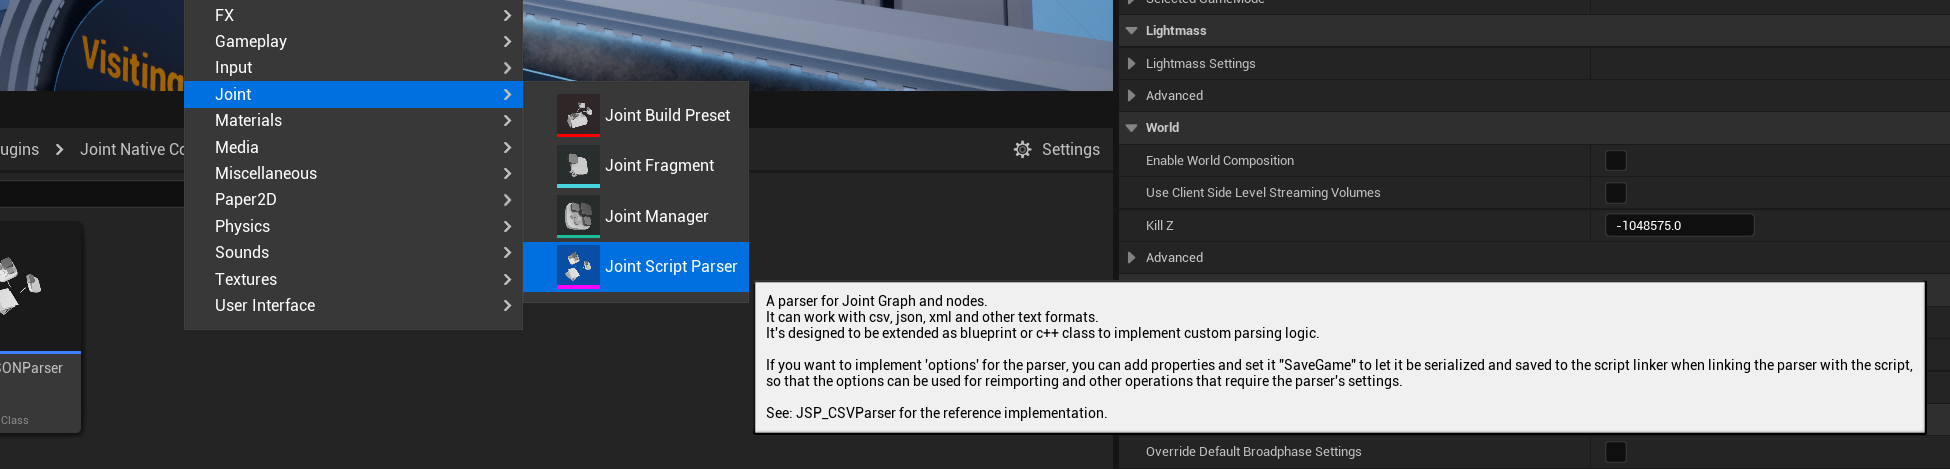
You can implement a new parser by inheriting from Joint Script Parser or by creating a new Parser Blueprint asset via Right-click in Content Browser -> Joint -> Joint Script Parser.
How does the parser work?
UJointScriptParser has HandleImporting and ParseTextData as its core functions.
HandleImporting
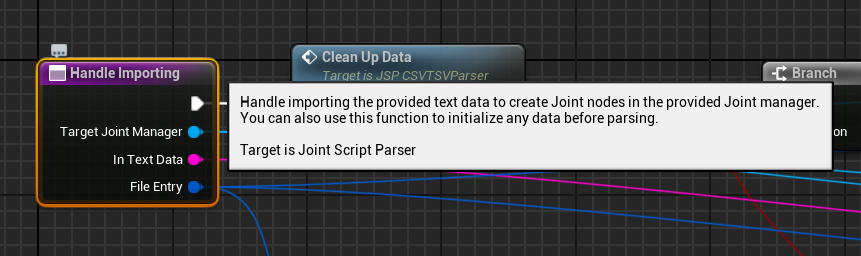
The HandleImporting function handles the import process. It receives the entire text data of the file, the Joint Manager where the imported nodes will be recorded, and the file entry data as inputs.
The default implementation splits the text data by newline characters and calls the ParseTextData function for each line.
It also calls the UJointEditorFunctionLibrary::LinkParserWithScript(this, FileEntry) function to link this parser instance with the file entry. (This is necessary for identifying which parser was used during subsequent re-imports.)
bool UJointScriptParser::HandleImporting_Implementation(
	UJointManager* TargetJointManager,
	const FString& InTextData,
	const FJointScriptLinkerFileEntry& FileEntry)
{
	TArray<FString> TextData;
	InTextData.ParseIntoArrayLines(TextData);

	FScopedTransaction Transaction(
		LOCTEXT("JointScriptParser_HandleImporting_Transaction", "Import Joint Script Text Data")
	);

	UEdGraph* GraphToAdd = TargetJointManager->JointGraph;

	TargetJointManager->Modify();
	GraphToAdd->Modify();

	// Get the asset - because the 'this' object is the CDO of the parser class, we need to get the asset instance to link with the script linker data element, so that we can find the correct parser instance when parsing the text data to create nodes.
	UJointScriptParser* AssetForCDO = Cast<UJointScriptParser>(this);
	if (!AssetForCDO)
	{
		FJointEdUtils::FireNotification(
			LOCTEXT("JointScriptParser_HandleImporting_Failure_Title", "Joint Script Import Failed"),
			LOCTEXT("JointScriptParser_HandleImporting_Failure_Message_CouldNotGetAsset", "Could not get the asset instance for the Joint Script Parser - This will cause issues with linking the parser with the script linker data element."),
			EJointMDAdmonitionType::Error
		);

		return false;
	}

	UJointEditorFunctionLibrary::LinkParserWithScript(this, FileEntry);

	for (const FString& Line : TextData)
	{
		TArray<UJointEdGraphNode*> RecognizedNode = ParseTextData(TargetJointManager,Line,FileEntry);
	}

	return true;
}
Naturally, if your parsing target is not line-based-for example, a JSON file-you would override this to decompose the text data into JSON objects and call ParseTextData for each object.
ParseTextData
The ParseTextData function parses unit text data and implements it as nodes in the Joint Manager. It takes the Target Joint Manager, unit text data, and file entry data as inputs. It outputs an array of nodes implemented from that unit of text data.
Looking at the node implementation logic of JSP_CSVTSVParser, it splits a row using a given delimiter, extracts data for each column, finds a Joint Manager node preset matching the column name, and implements the node based on that preset.
The image below is an example of this logic: For the data in the 1st index column (Type), a switch statement identifies the production type and creates a node based on the corresponding node preset for that type (e.g., Monologue preset, Select preset, etc.).
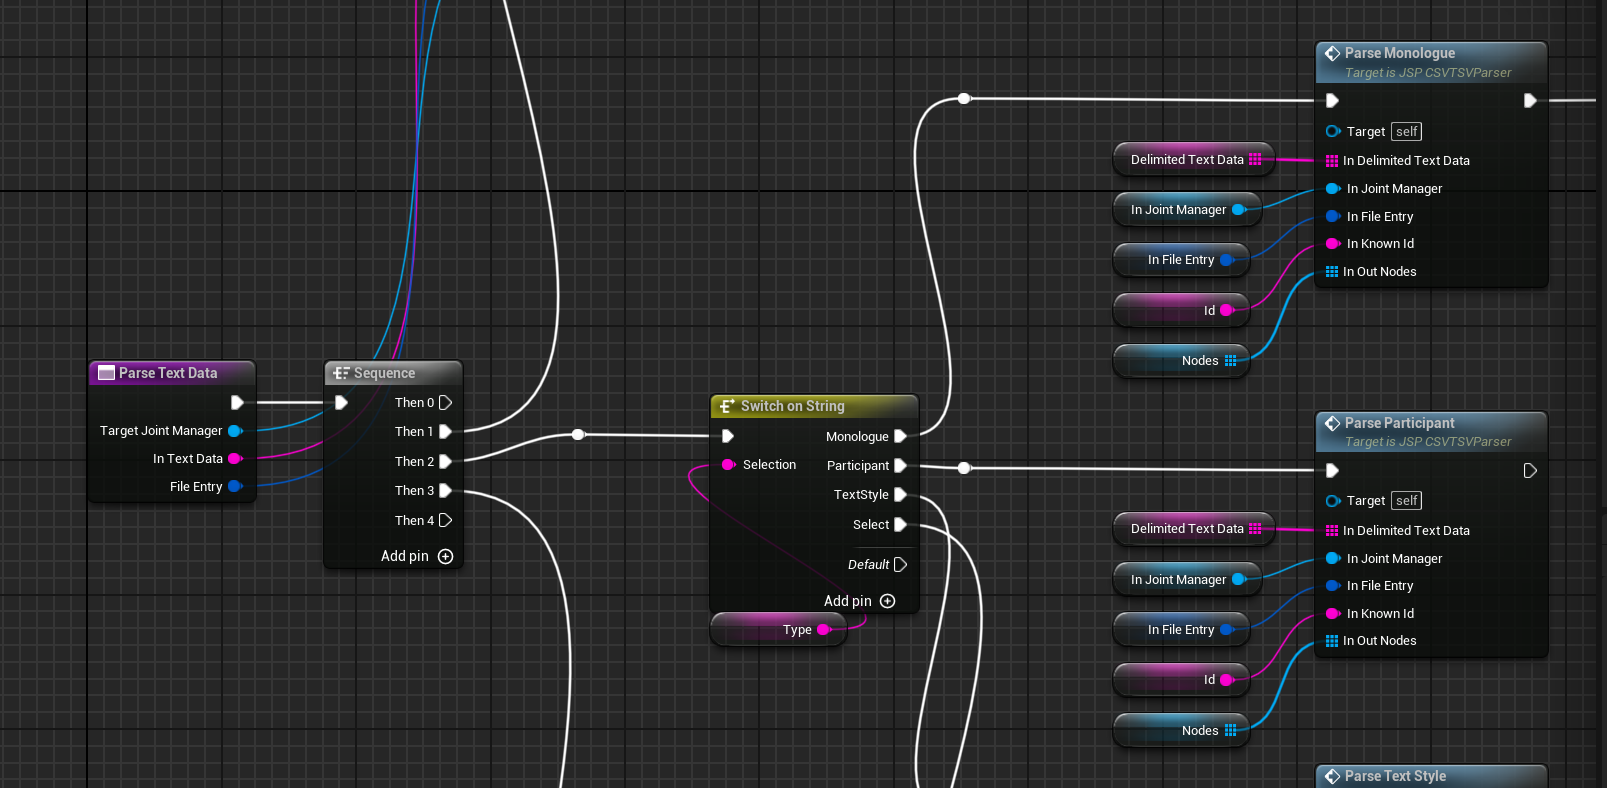
Here is an example of logic implementing a node based on the Monologue preset: it implements a base node (foundation), then implements a Sequence fragment and attaches it to the base node.
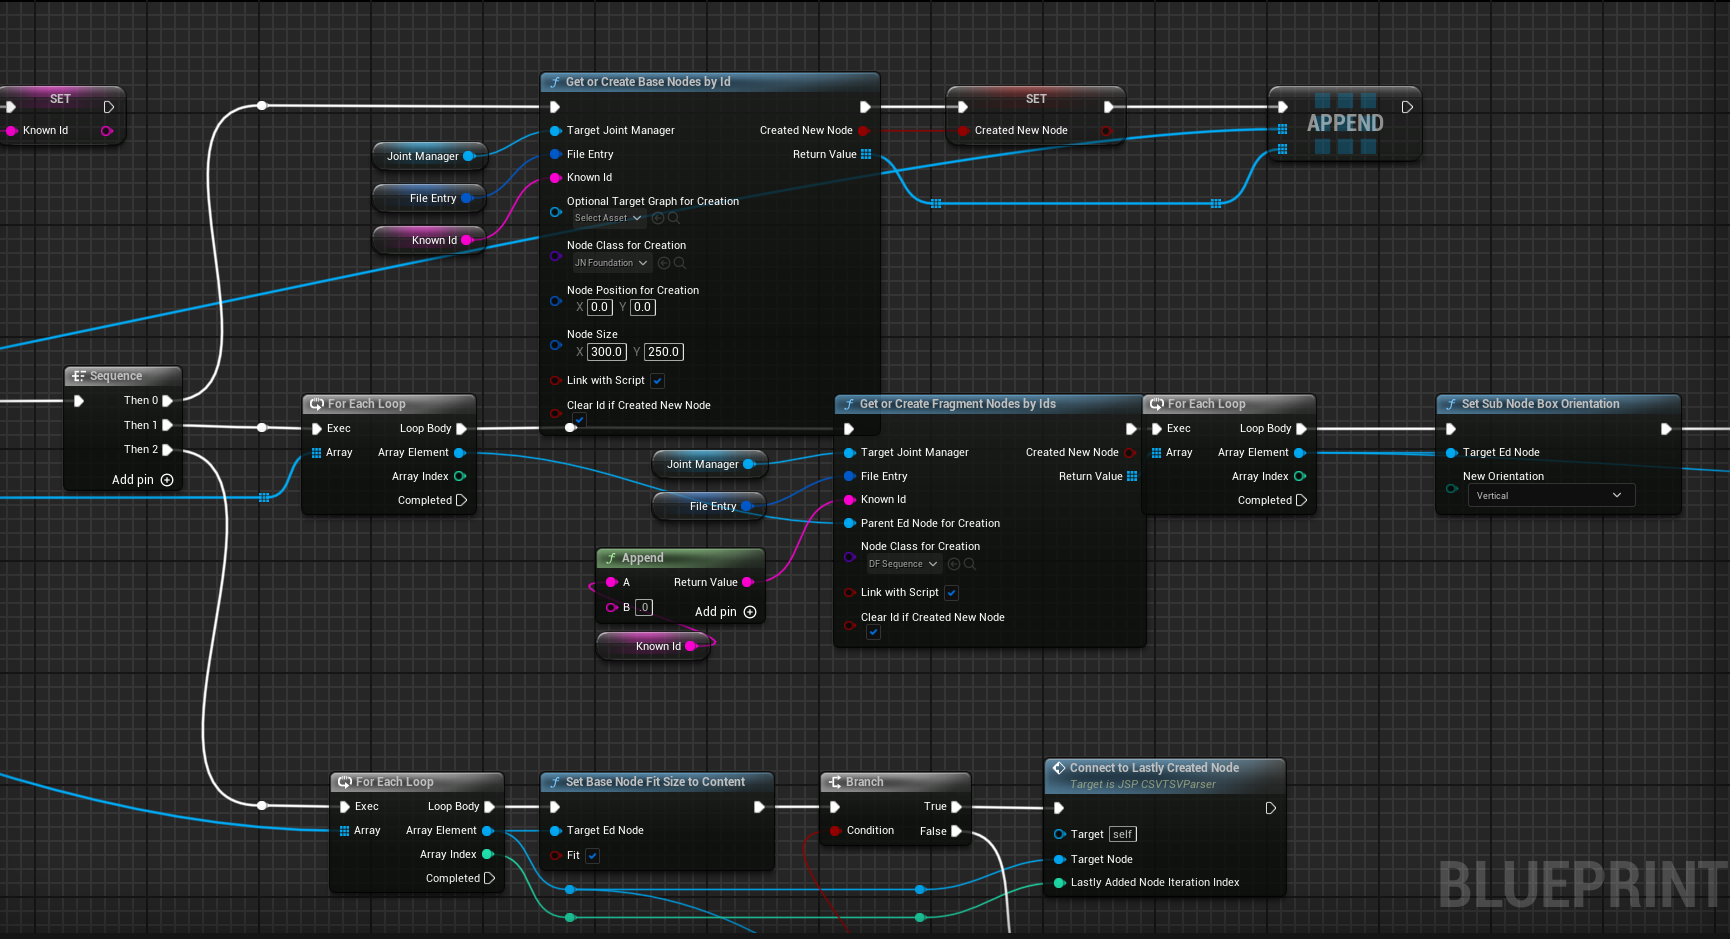
Afterward, it implements sub-nodes to be attached to the Sequence fragment-such as Speakers & Listeners, Text, and Wait Skip-and fills in the data.
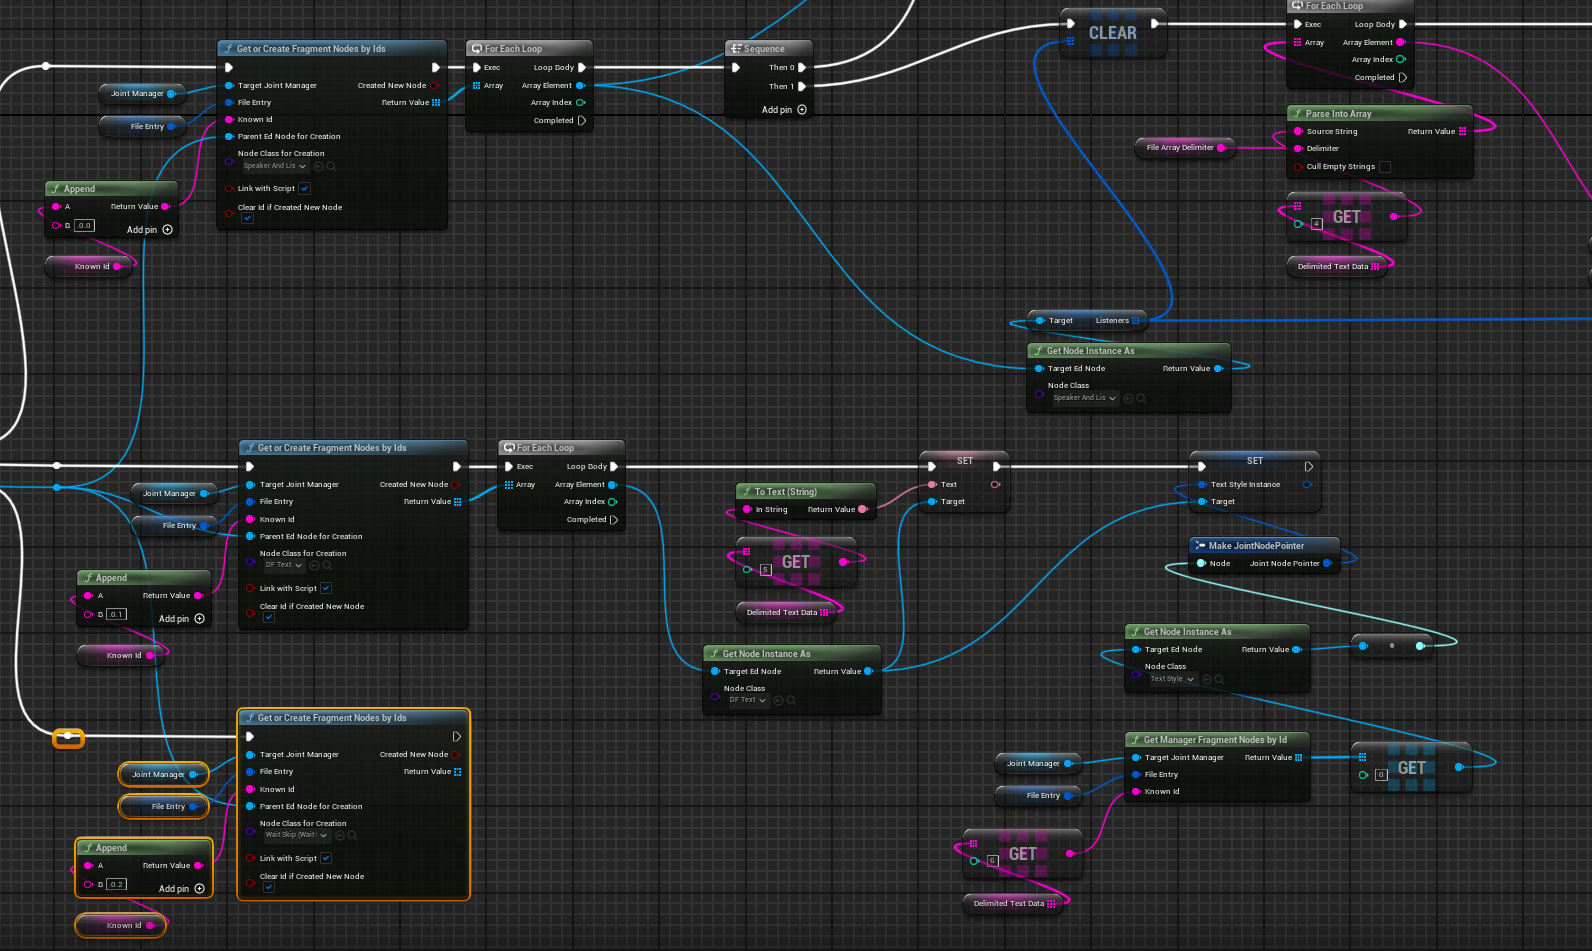
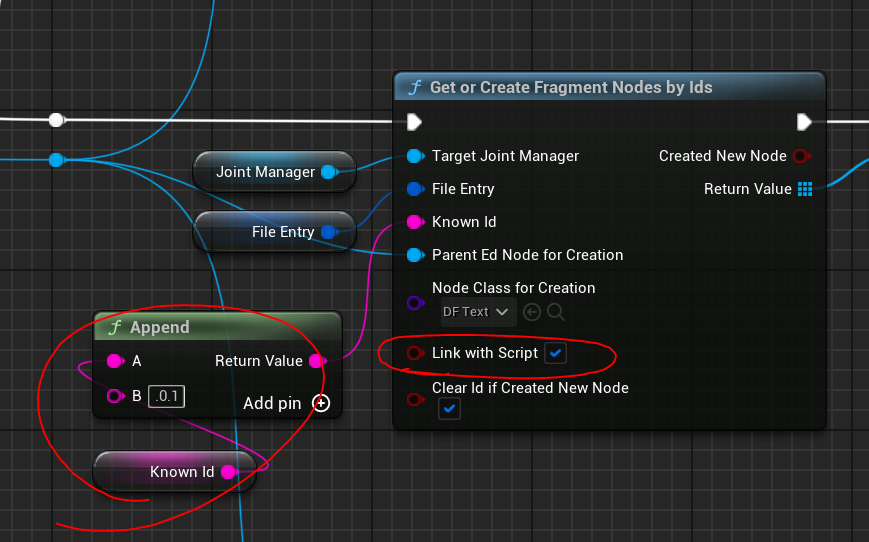
Also, when creating a node, the bLinkWithScript option is enabled to link this node with the imported file. This allows the system to track which text data in the imported file was used to implement this node during future re-imports.
Linking is just as important as creating the nodes because it allows easy access to specific node references during parsing and enables the system to find the nodes that need data updates during re-imports.
In the case of JSP_CSVTSVParser, it uses a '.' to distinguish hierarchies and enters IDs based on the pre-order traversal of the tree.
For example, a Sequence node's ID might be 'RowId.0', the Speakers & Listeners node's ID becomes 'RowId.0.0', and the Text node's ID becomes 'RowId.0.1'. This allows hierarchies to be represented even in CSV/TSV files, which are normally difficult to represent hierarchically.
There are limits to explaining this part through text. If you plan on implementing a parser yourself, I believe the most helpful approach is to look directly at the logic of the example parser, JSP_CSVTSVParser. I recommend examining the node implementation logic to understand the concepts explained here!
Try Creating Your Own Parser!
As you can see, the area Joint provides is essentially tools to make "text parsing" easier, helper functions for graph management (tracking and updating imported nodes), and that's about it. Therefore, if you want to handle text imports with your own custom syntax, implementing a custom parser is all you need.
In particular, if you create a parser that implements JSON as a graph, external editing would become a very simple task! (I actually wanted to support this by default, but I couldn't implement it due to time constraints.)
Of course, since this effectively requires you to build a "parser" that reads text, this approach might not be suitable for every project. It is likely an area to explore only if your project is very large or if the dialogue system acts as a core element of the project. (Though if that is the case, you will find it extremely useful!)
That is why we provide the CSV parser by default and will continue to update it so that many features can be handled directly. We want to ensure that even small-scale projects can utilize external file importing without any worries!
UJointScriptParser is an editor only object type which is located in the JointEditor module. If you're working with c++, you can take advantage of this - you can access all editor-only functions and features in your parser implementation, which can be very helpful when implementing complex parsing logic or when you want to create editor utilities to assist with the parsing process.
Joint Node Preset
The Joint Node Preset feature is still in its early version and may not be perfect in terms of usability or stability. It will be improved in future updates.
Joint Node Preset is a new feature added in the Joint Milestone update. it allows you to save a set of a specific node and its sub-nodes in a Joint Manager graph as a preset, which can then be loaded later to implement them as a batch in the graph.
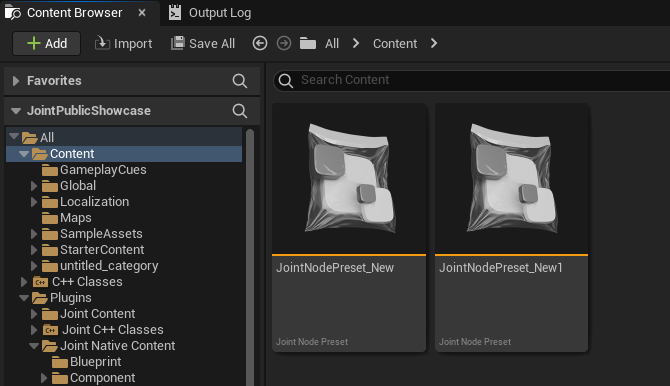
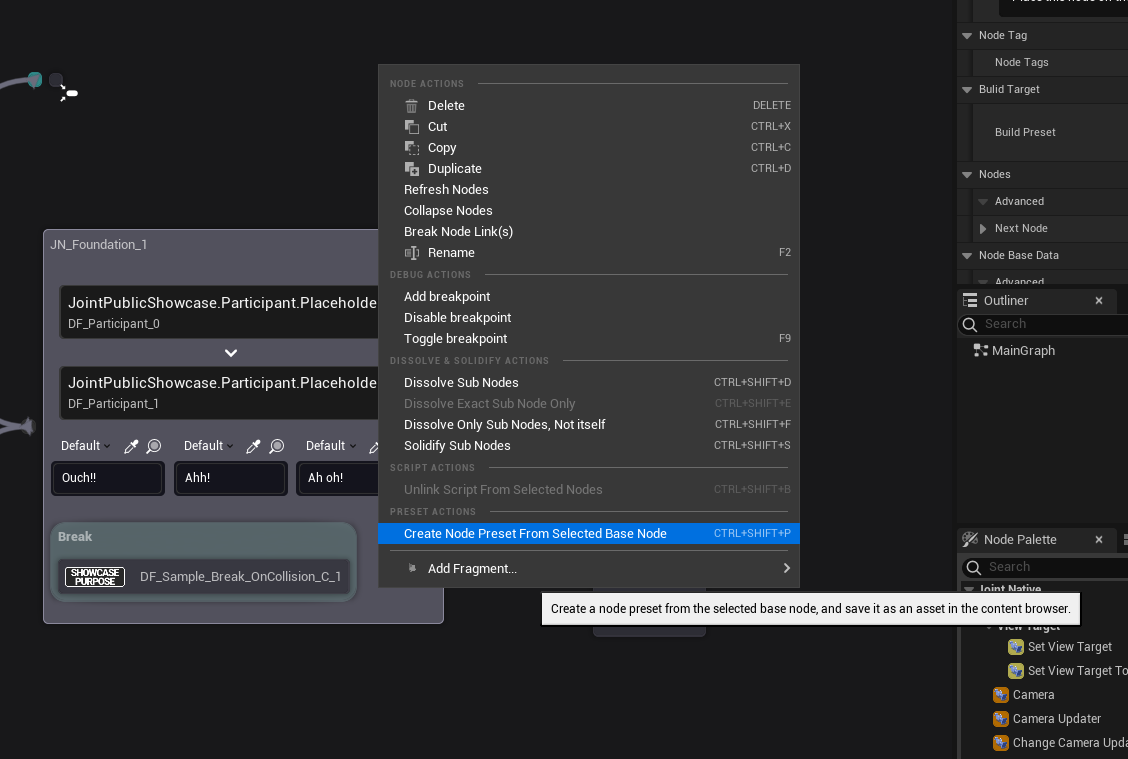
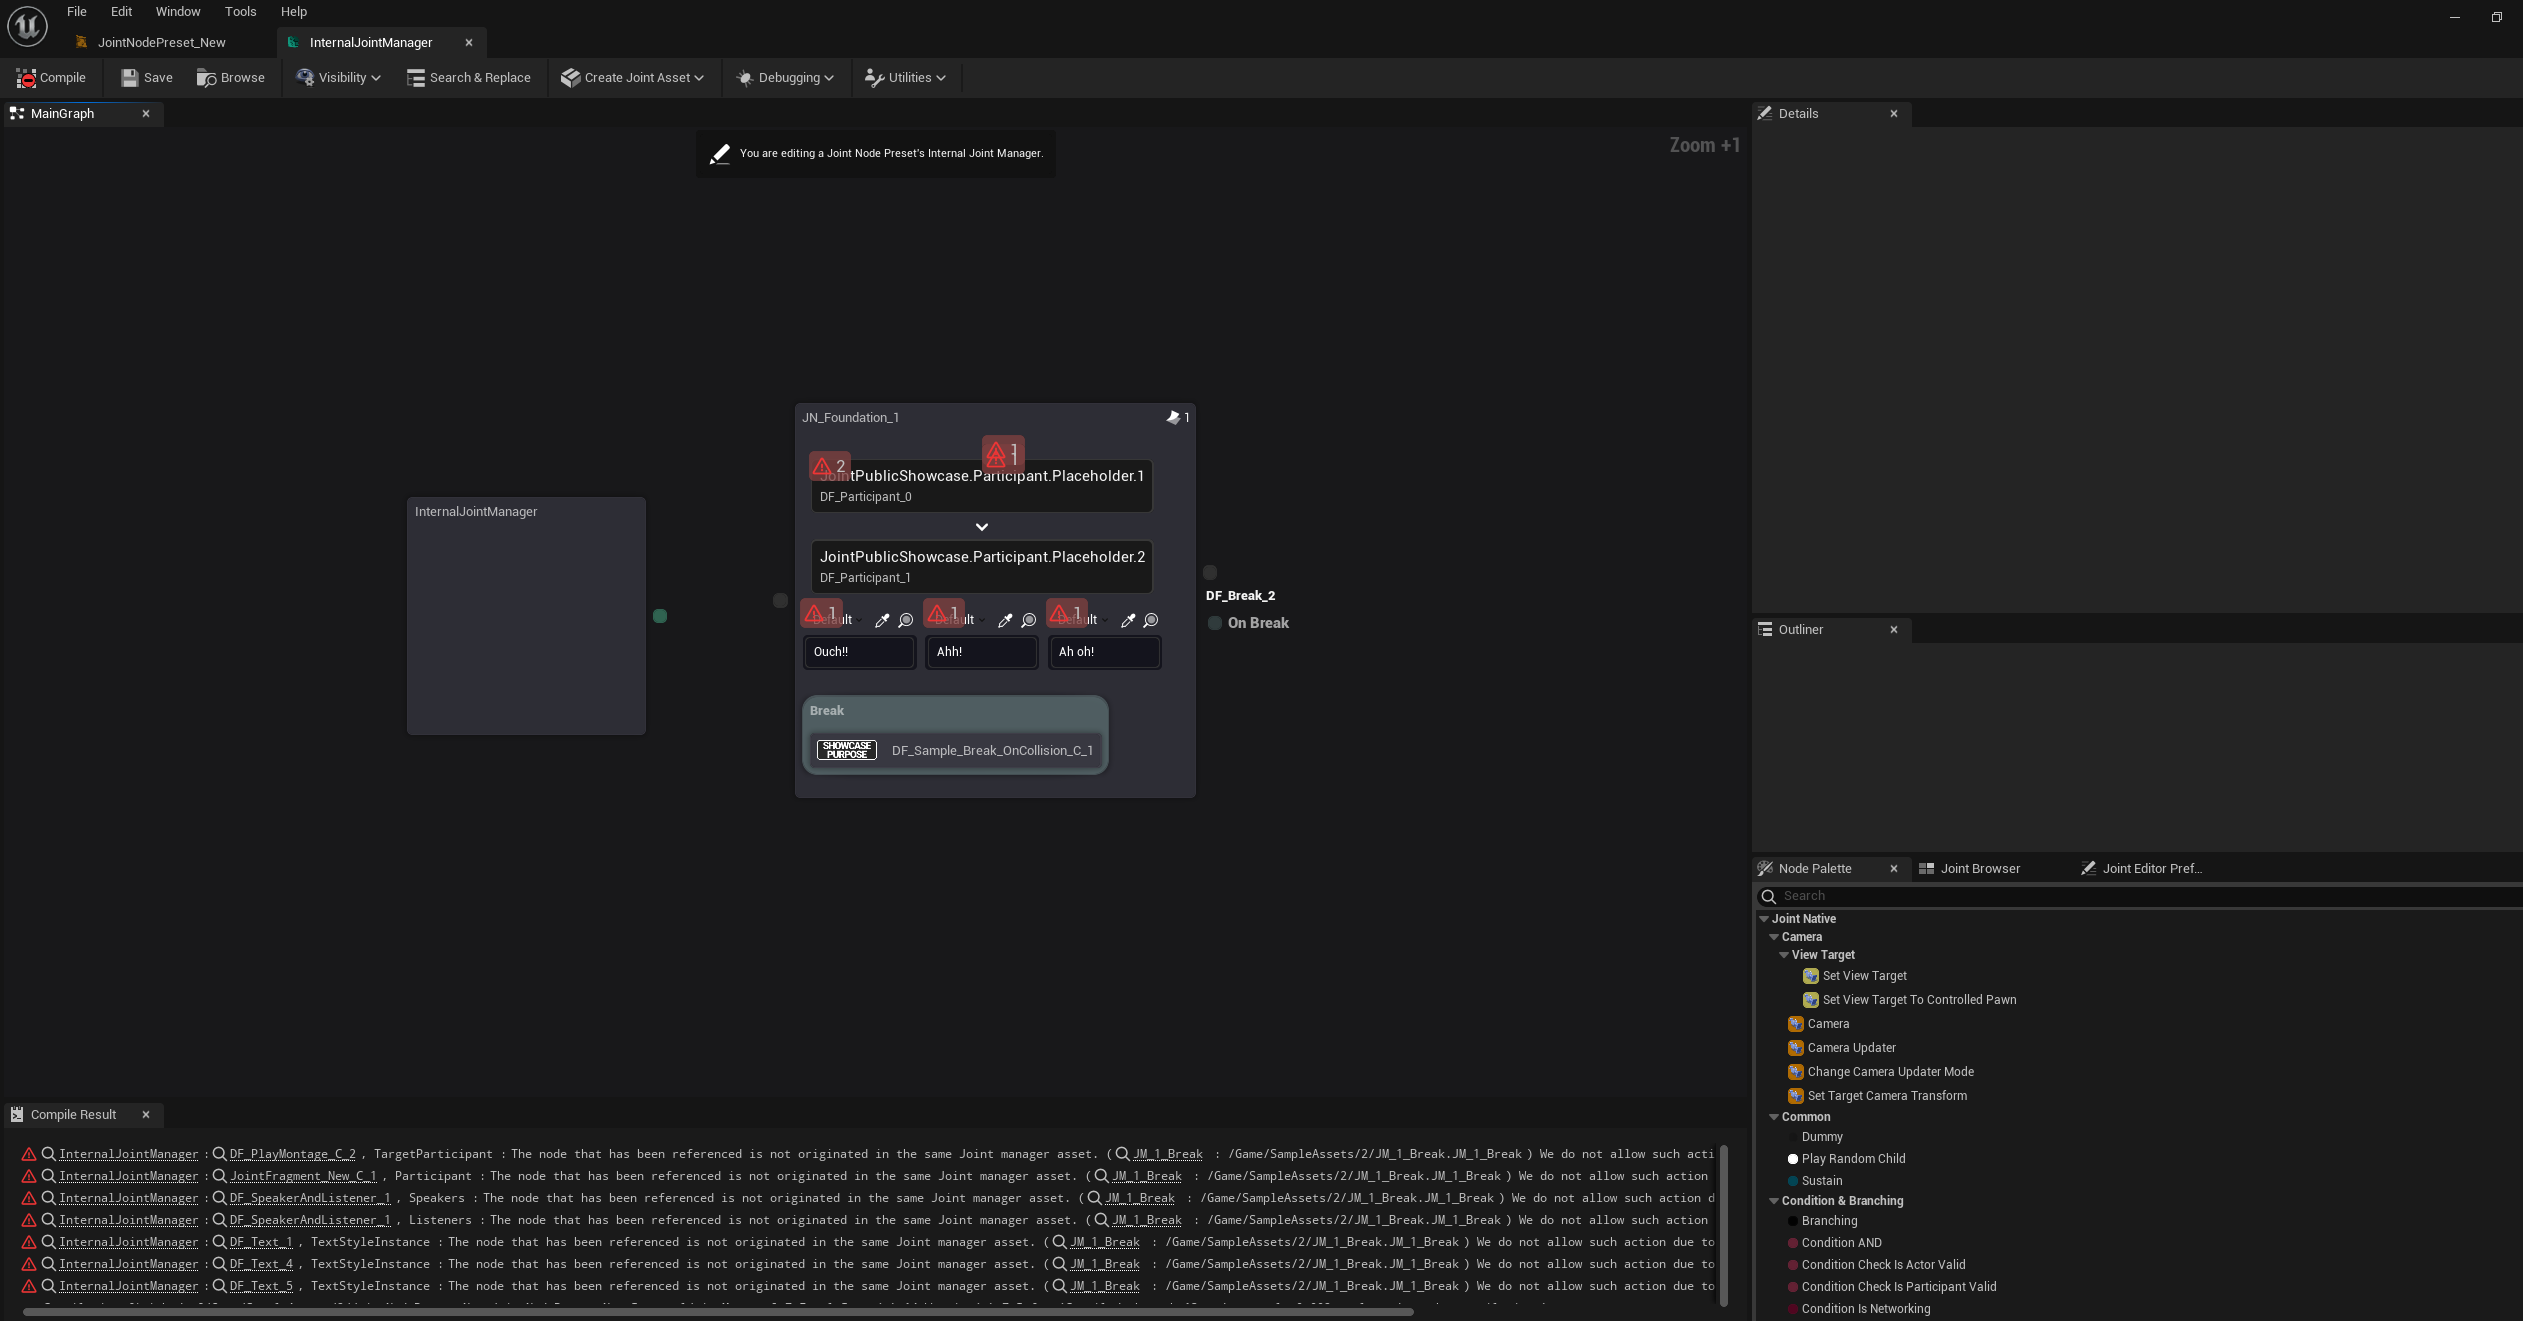
Generally, Joint Node Presets cannot be created directly in the Content Browser. You can create a new preset by right-clicking a base node in a Joint Manager graph and selecting the Create Node Preset From Selected Base Node option.
Opening the asset brings up the following screen. At the bottom is a previewer showing the nodes in the preset, and at the top are fields to enter the name, description, and visuals of the preset. Since the name and description are used to identify the preset in the Node Palette, it is recommended to enter them clearly.
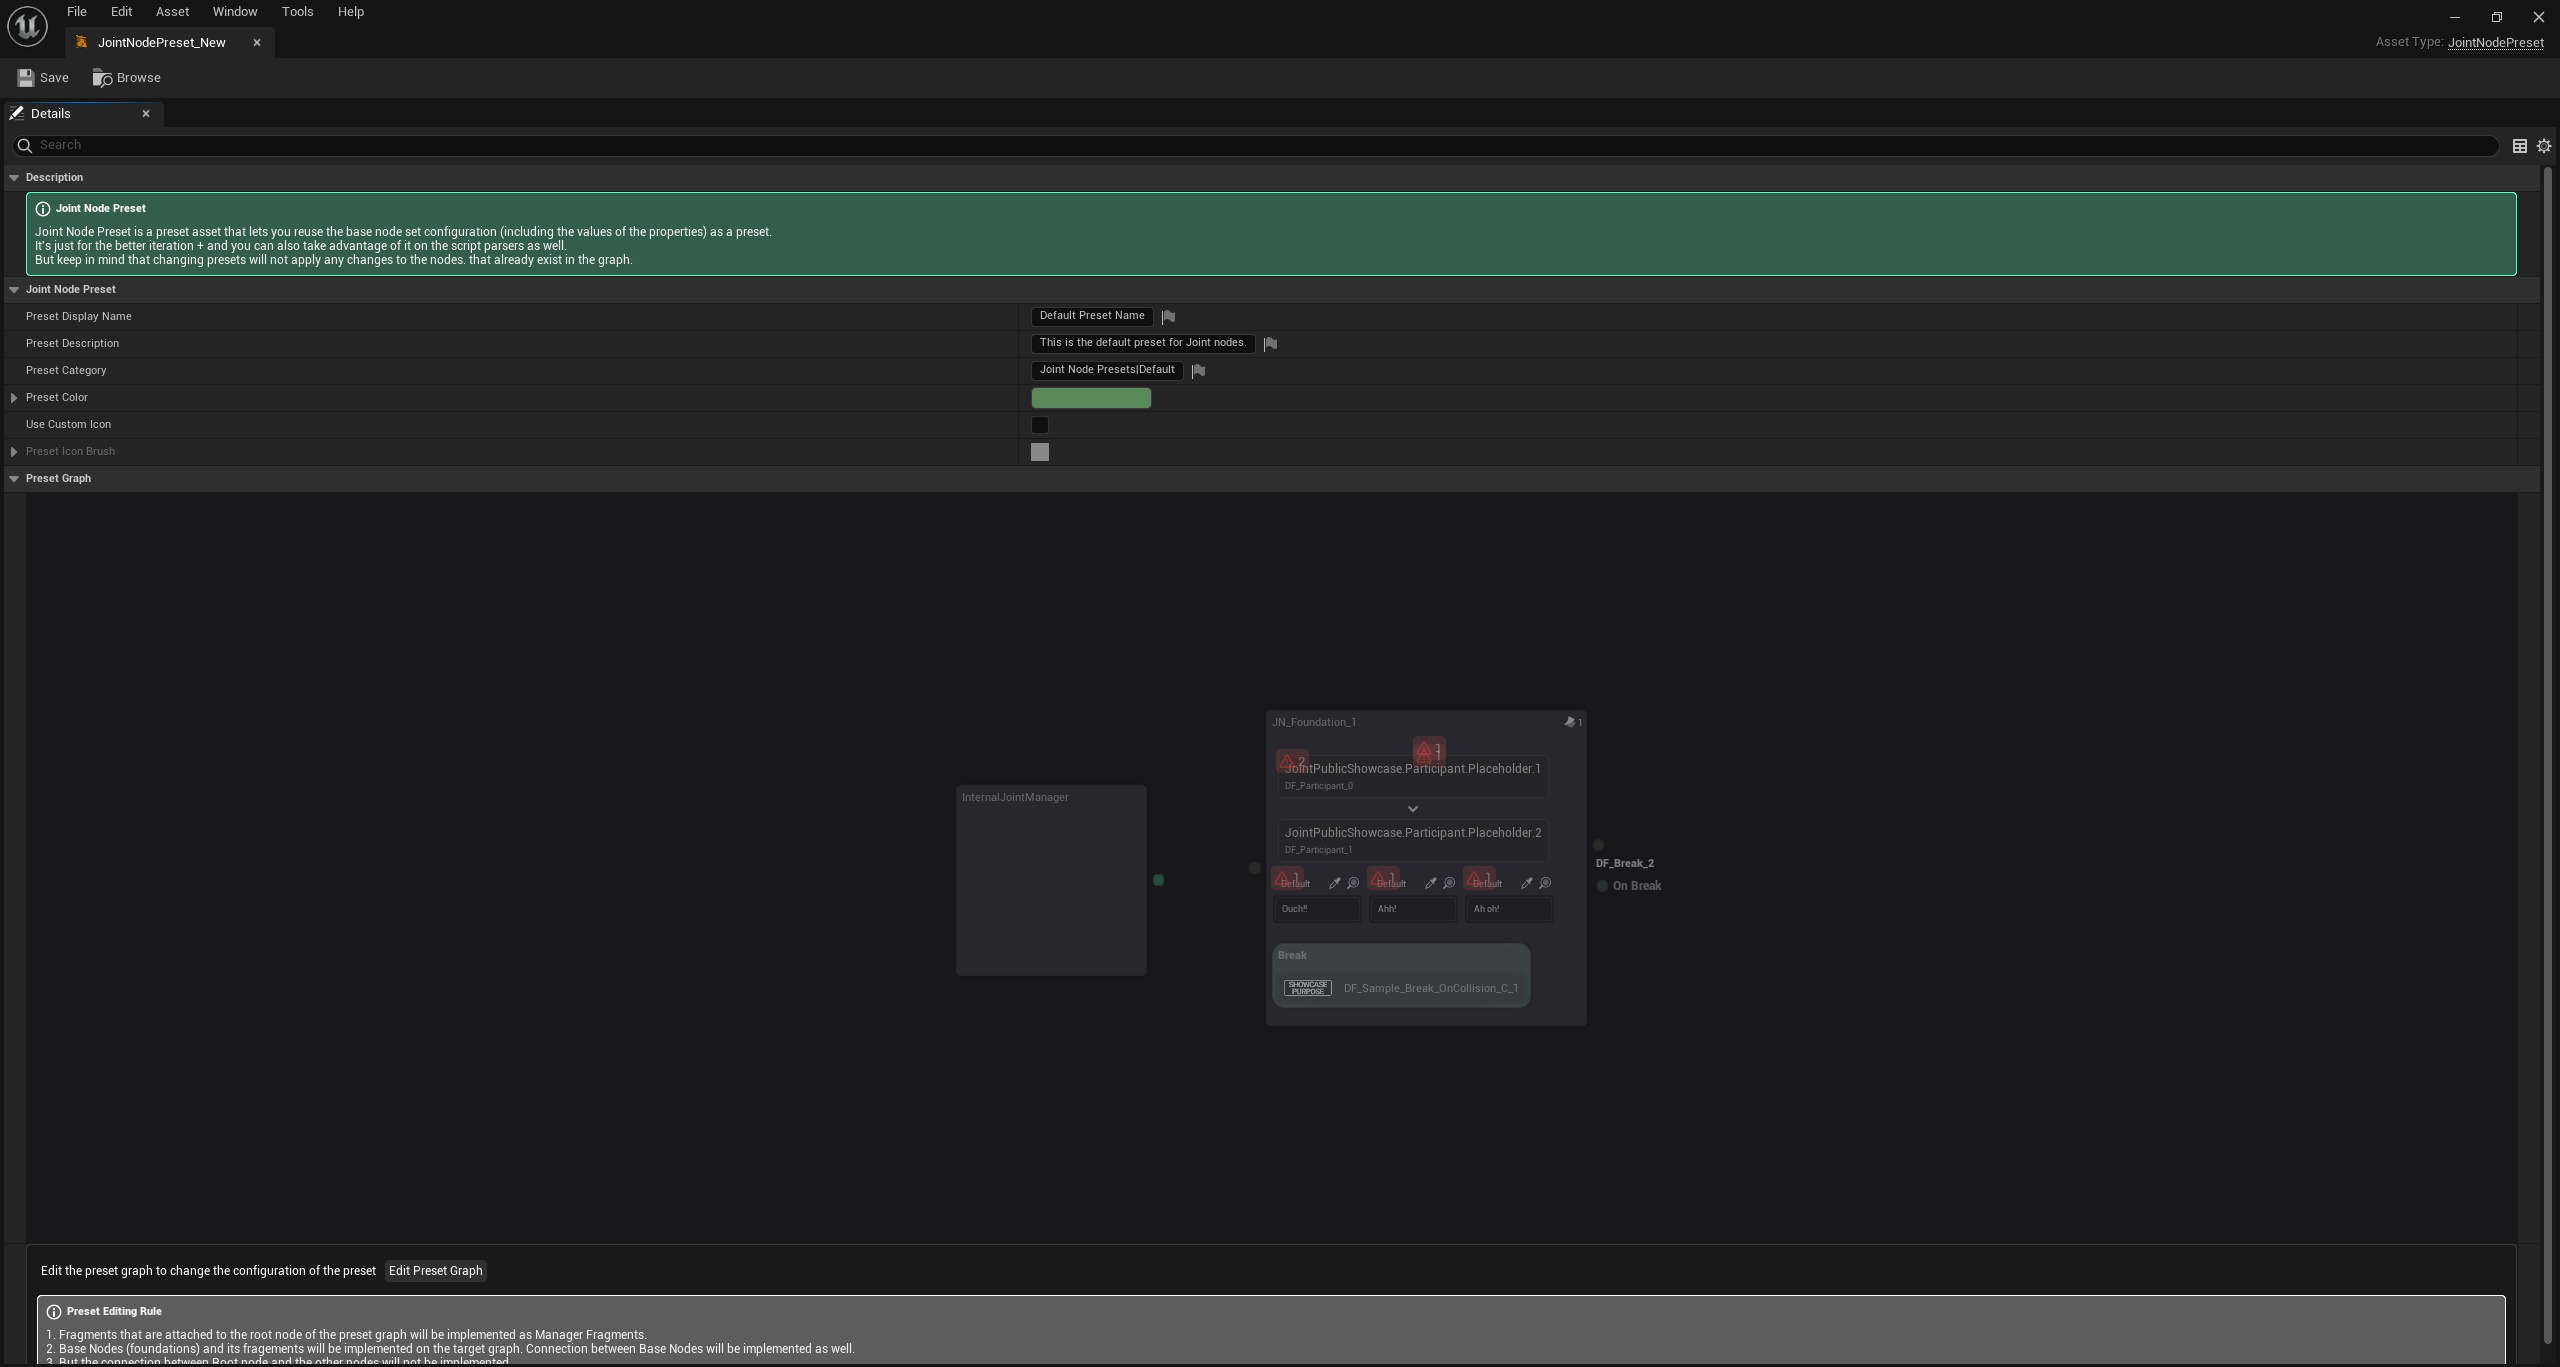
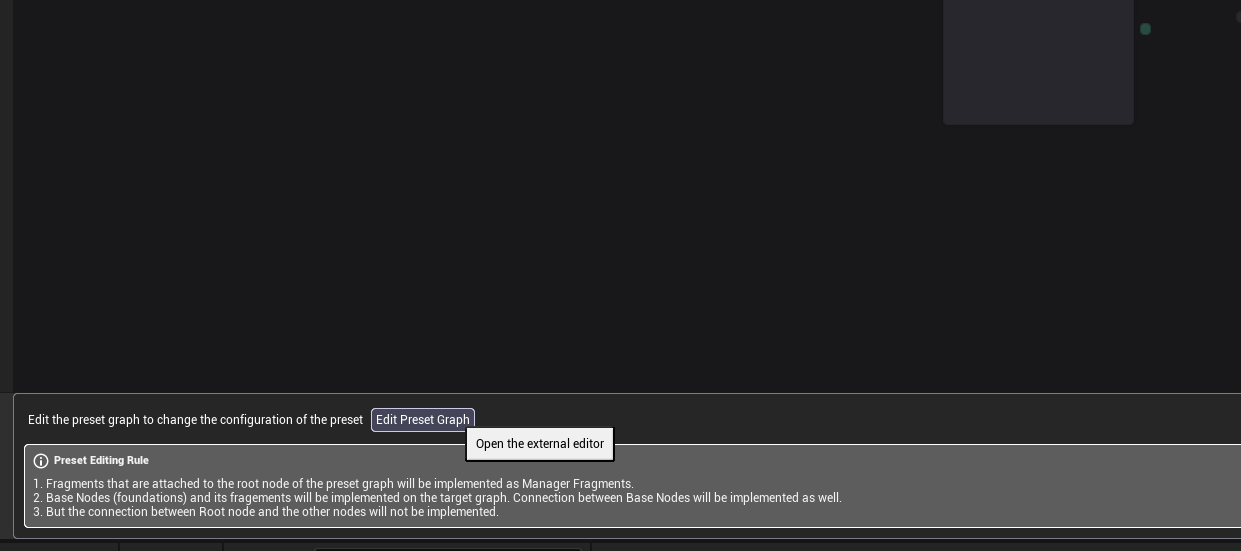
Clicking the Edit Preset button at the bottom opens a screen where you can edit the nodes in the preset. In this screen, you can add or remove nodes included in the preset and modify their data. Saving the preset reflects these changes.
Presets are displayed as unique widgets in the Node Palette. By clicking the corresponding action, you can create a group of nodes in the graph based on the preset.

Using Joint Node Presets in Parsing
If desired, you can implement a parser by creating a Joint Node Preset and implementing nodes as a batch based on that preset, rather than implementing nodes one by one and attaching sub-nodes individually.
This is a particularly useful approach if you want to handle parsing by "production type." Especially for CSV, where hierarchical data is difficult to represent, you might define a specific production type (e.g., play dialogue, provide branching choices) per row. In such cases, creating a node preset for each production type and implementing the whole set at once is logical and effective.
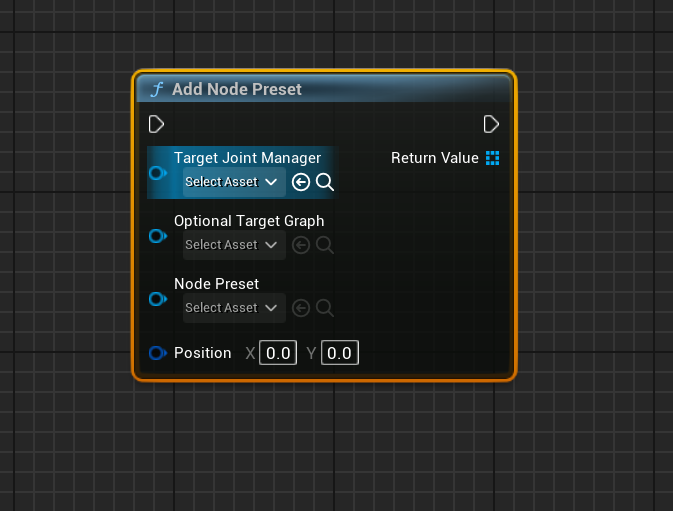
You can use the Add Node Preset function to implement nodes based on a node preset in the graph.